Exposure for Lego photography | Tutorial
Original: Jun 21, 2018
latest: February 15, 2022
If want to create amazing Lego photos or panels for your Lego comic, you’ll need to know how to light your photos. Many beginning Lego photographers or Lego comic creators don’t even think about lighting because they use full-automatic cameras (or smartphones) to shoot their photos. However, if you would like control over the lighting of your Lego photos, or if you want some background information, this comprehensive post on exposure is for you. This is the first post within a series of guides on exposure, the others being on aperture, shutter speed and ISO.
Exposure, the basics
Exposure is the amount of light that your camera sensor is exposed to when you take a photo. It is directly related to the bright- and darkness of (parts of) your photos. To control exposure, you can use three factors;
- The amount of light on (parts) of your scene.
- Aperture settings
- Shutter speed
Related to exposure are the sensor sensitivity (ISO) settings. Many photographers describe ISO as part of exposure, because it affects the brightness of a photo, just like exposure does. Yet, ISO settings do not influence exposure at all, since it does not control the amount of light that reaches your camera sensor. It brightens the image after the sensor has already been exposed to light.
The exposure-triangle
The so-called ‘exposure triangle’ (figure 1) shows the relationship between the aperture, shutter-speed and ISO-settings. Changing one of these settings will influence the brightness of your photo, and each has other effects. Changing aperture-settings influences depth of field (DOF), changing shutter-speed-settings influences motion-blur and changing ISO-settings influences the signal-to-noise-ratio.
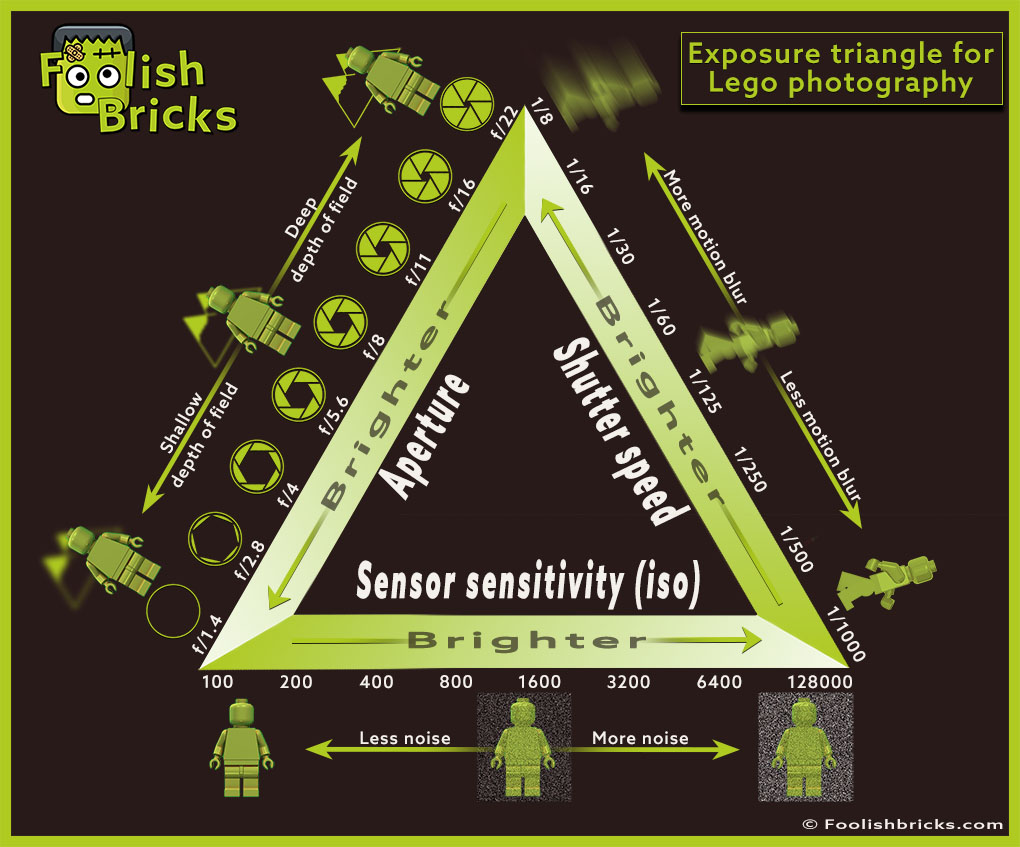
The relationship between aperture, shutter-speed and ISO
Exposure value and stops
A specific combination of aperture, shutter speed, and ISO-settings is an exposure value (EV). A change that either doubles of halves the amount of light reaching the sensor (or doubles of halves the ‘sensitivity’ in case of the ISO) is a stop. The stops are displayed in figure 1 too; for example, a change in aperture-setting from f/2.8 to f/4 is one stop, from f/2.8 to f/5.6 is two stops etc. Same goes for ISO and Shutter speed.
If you want to keep the EV equal whilst changing one setting one stop or more, you need to adjust one or two of the other values for the same amount of stops in the opposite direction. For example, if you want to keep the EV stable and you change the aperture-setting from f/5.6 to f/11 (2 stops darker), you could change your shutter-speed from 1/60 to 1/15 (2 stops brighter), or your ISO from 100 to 400 (2 stops brighter) or a combination; shutter-speed from 1/60 to 1/30 combined with changing ISO from 100 to 200. Is this way you can keep the brightness of your photo equal whilst changing other effects (DOF, motion-blur or signal-to-noise-ratio).
Camera priority modes
The possibilities are endless and dependent on many factors, however, your artistic vision is the most important. At first, you can play with these settings if your camera allows it. Most high end cameras have priority modes that will determine other values dependent on the exposure the camera ‘decides’ is the right exposure.
- Aperture priority mode: You set the aperture, and the camera decides shutter speed and ISO within a range you set.
- Shutter priority mode: You set the shutter speed, and camera decides aperture and ISO within the range you set.
- Sensor sensitivity mode (Pentax): You set the ISO, and the camera decides shutter speed.
Exposure compensation
Most cameras have exposure compensation (the +/- button). This compensation will come to your rescue if you use a priority mode and you disagree with the exposure the camera ‘decides’ is right. With this button you can force the camera to change the exposure your camera thinks is right and make your photo darker or lighter. The numbers are stops, so if you want the camera to make your photo 2 stops lighter, press the +/- button and turn it to +2. If you want to make it 1 stop darker, turn it to -1.
Dependent on the priority mode you’re using, the exposure compensation will change different settings to get the exposure you desire:
- Aperture priority mode: exposure compensation will change your shutter speed (also influencing motion-blur).
- Shutter priority mode: exposure compensation will change your aperture (also influencing DOF).
- Sensor sensitivity mode (Pentax): exposure compensation will change your shutter speed (also influencing motion-blur).
- Program mode: exposure compensation will change your shutter speed (also influencing motion-blur), in the cameras I used.
Over- and underexposure
Normal exposure is similar to what our eyes see. This does not mean that normal exposure is the right exposure. The right exposure gives you the amount of light you want in your picture, so it is an artistic decision. Maybe you purposely want to over-or underexpose (parts) of your image/ panel, related to the mood you want to create in your panel.
Overexposure
Overexposure happens when too much light is captured by the camera, resulting in a (very) bright image. In the highlights, the pixels are pure white and there won’t be any details recorded (so-called ‘blow-out’). Mostly you will get muddy, bleak photos. Yet, when photographing low light scenes, overexposing a little (only one stop) can bring out more details.

Underexposure
Underexposure happens when too little light is captured by the camera, resulting in a (very) dark image. Many photographers will underexpose a photo just a little (only one stop) because this can lead to deeper and more saturated colors (for example, a sunset). However you underexposure the photo too much, you will end up with a dark image where most of the details are lost.

Generally, you want to avoid overexposure when possible. When overexposing a photo, the areas that were “blown out” to white are unsalvageable in photo-editing software. More detail is preserved in areas that appear to be pure black in your photo, so you’ll have more information to work with once you decide to edit the photo (however, there usually will be some noise). So, when in doubt; underexpose your photo, and afterwards salvage the underexposed areas in postproduction.
Sometimes it may be difficult to expose an image right within your camera, usually because there are bright and dark areas combined. A famous example is a bright window in an otherwise darker room. Your eyes/ brain can deal with these differences perfectly, however, if you want to make a photo of this situation you have to make choices.
Coming up…
The following post, is an extensive beginners guide to aperture.
OTHER POSTS THAT MIGHT INTEREST YOU;


You can subscribe to the newsletter to receive occasional updates from Foolish Bricks.