Storytelling in Lego photography | Tips & Tricks
Original: Feb 5th 2019
Latest: Jan 31th 2022
Storytelling is one of the most important aspects of Lego photography. Photos that are nothing more than beautiful will certainly attract attention and they will momentarily awe someone. Yet, they probably won’t be remembered for very long. It’s the images that tell a story, the ones that seem to speak to the imagination, that will linger in someone’s mind for a much longer time.
How does a single image tell stories?
You don’t need to create a lego comic to tell a story with Lego-photos. Storytelling is mostly done with isolated photos. A single photo is an image frozen in time. As such, it does not tell the viewer what happened before or what lies ahead. The art of storytelling with a single image involves persuading the viewers to create their own version of a past or future, based on the image you presented them with. In short; a (Lego-) photo doesn’t tell the story. The photo motivates the viewers to create their own personal, emotional stories! And since all people are different, these stories will differ, amongst other things depending on memories, personality and experience.
This also explains why some pictures will tell an elaborate story to one person and are quiet to another. I cannot give you a straightforward recipe. I mean, storytelling through Lego-photography can be really hard. However, I can give you a few basic tips to increase the chances of your Lego-photo telling a story.
I need a hero
First off, who or what is the hero in your image? Is it a person, animal or maybe even an inanimate object (for example, an old abandoned car, or a lonely house on the hill)? Then ask yourself if your protagonist is interesting enough to make people wonder. Simply taking a picture of a tree or Lego-minifigure just won’t do it. You’ll have to provide the viewers with some context concerning your hero and take control of the entire frame. Thus, inviting viewers to (unconsciously) start thinking.
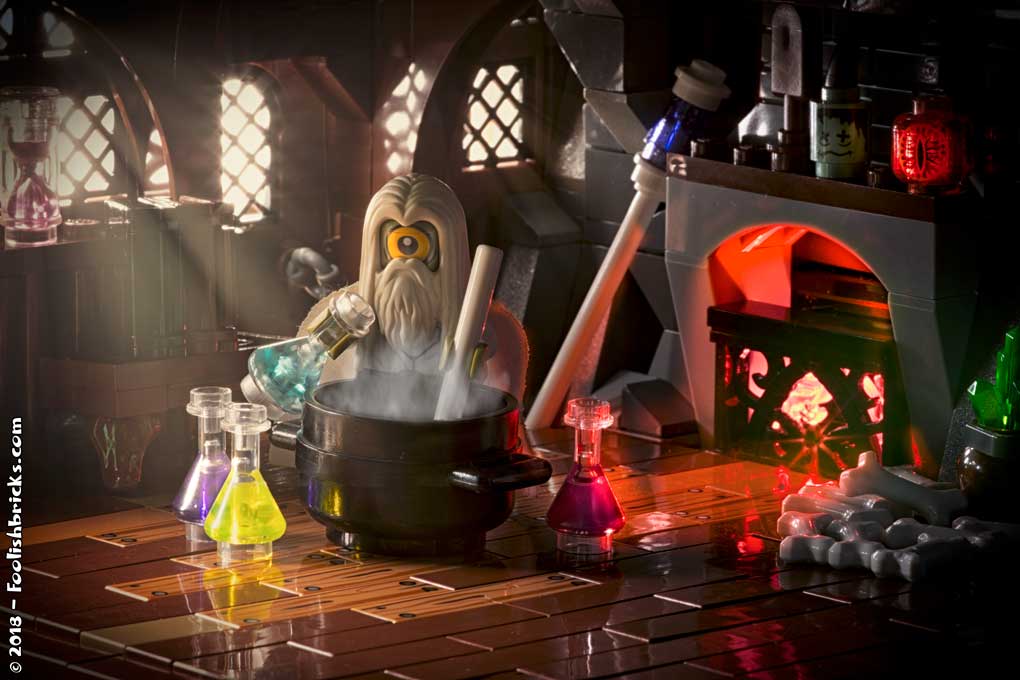
For example, Figure 1 shows Willy the One-Eyed wizard. As you might know, there is an elaborate backstory on him in the first Foolish Lego Comic, and an even more elaborate backstory in my mind. Yet, I wonder, what is your story for him when you see this image? And maybe this Lego-photo fails to tell you a story at all, but, even that is interesting to think about! Why doesn’t it speak to you? What would you have done differently?
The story is in the details
Second, it may be a good idea to include details! These may be larger or smaller details. And sometimes even the smallest of details may just be enough to get the train of thoughts of the viewer rolling. And a story is born.

Figure 2 shows the photo “Lonely”. There are quite a few details in there. For example, the ring and the closed umbrella even though he’s standing in the pouring rain. That alone could trigger a few (love?) stories. Another detail is that the protagonist is an elderly, so maybe he just became a widow? Besides, what is he doing street side, dressed up with a bow tie, but not caring about the rain? Enough to think about. There are quite a few stories in there as long as the Lego-photo is inviting enough to make people care to look at the image long enough to find the one stories that appeals to them.
Plastic emotions
Third, storytelling through photography is about emotions. Conveying emotions and body language with rigid Lego-minifigures is challenging . Also, because not every facial expression is available.
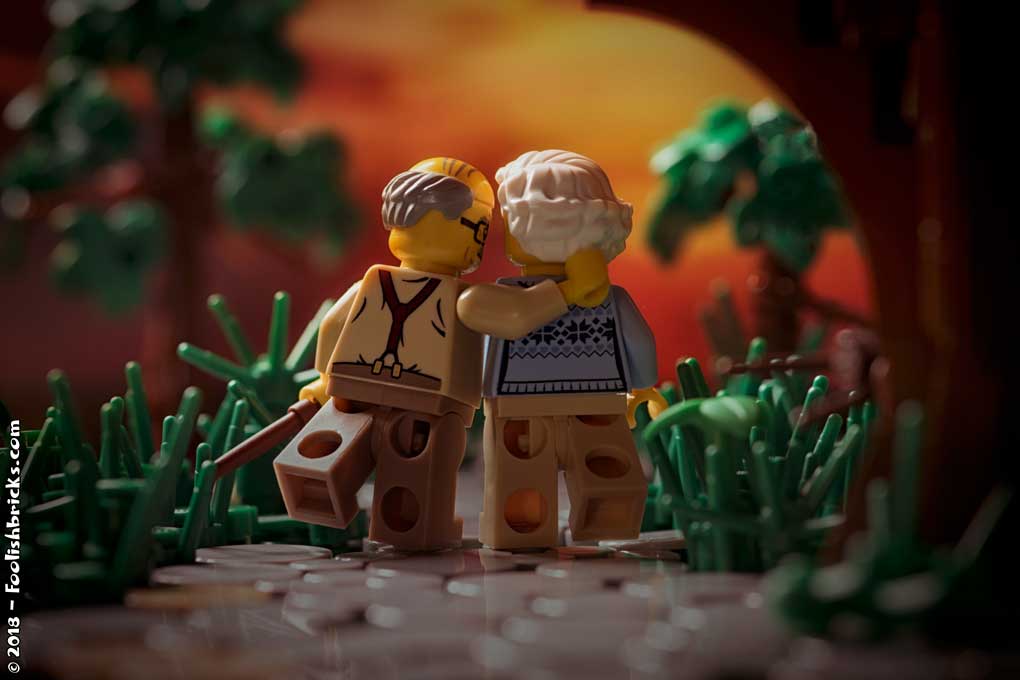
The first thing you need to do is to find a facial expression that fits your image or works around the facial expression. Look at figure 3; I wanted a loving face for the elderly lady, buy could not find one. Yet, by hiding the lady’s face, I created the loving face I wanted. In contrast, other viewers might feel this guy has to make up for something while she is looking quite angry. Again, there are many stories in this one image.
Also, you need to pay attention to the stance of the Lego-minifigures. That is the closest thing to body language they have. And if there is a stance that seems impossible; sticky tack could solve many problems. Also remember to pay attention to the hands of Lego minifigures; you wouldn’t believe what a difference the rotation of the hands can make for conveying emotions.
Last, do not forget the surroundings, lighting and especially color. These three elements can drastically change (or destroy!) the emotion and thus the potential for storytelling by your (Lego-) photo.
Go right… AND left
Fourth, if you’d like, you can add ambiguous or contrasting elements in your images.
Overall, there are three types of stories that can be told through (Lego-) photography; personal stories, documentaries and, last, ambiguous stories. Documentaries rarely benefit from ambiguous elements. Also, don’t use this tip if you are looking to tell a singular story.
That being said; adding ambiguous elements in your Lego-images could increase the potential of your photo for telling over one story, potentially reaching a wider variety of viewers. However, don’t overdo it! You don’t want to completely confuse the viewers… unless you do 😉

Figure 4 shows “lousy hitchhiker”. What happened here? And why is this person (M/ F?) carrying an axe in what looks to be a desert? Besides, why is (s)he still holding on to that axe, etc. Questions bring theories, theories bring stories, stories make a Lego-photo memorable.
Remember the effect of color(-temperature)
Fifth, colors convey emotion and have the ability to communicate all kinds of information. So, using the appropriate colors and temperature is important for creating your story. Warm colors (like red, orange and yellow) are exciting and can convey danger, passion, happiness and adventure, whilst cold colors mostly convey quiet, rest, contemplation, and sadness. All colors in between have their own characteristics and meanings.
It doesn’t always have to be about light-color. Giving a certain object a specific color can also be meaningful. For example (spoilers in examples); each time they showed something red in the movie: ‘the sixth sense’, a spirit/ ghost was near. And anytime they’d show an orange in ‘the Godfather’-trilogy, someone was about to die.
Last, combining colors and lighting setup can be even more powerful; imagine a person sitting in a dark cold interior, with warm light coming in through the boarded-up windows; this image talks about someone battling their own dark thoughts whilst happiness tries to reach this person… and fails.
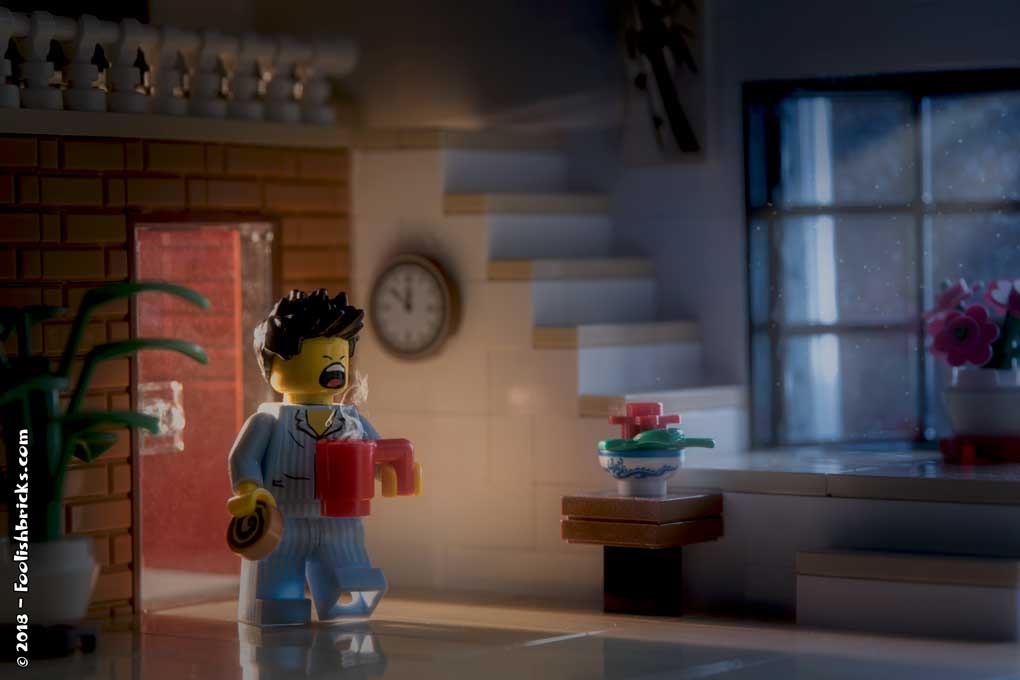
Look at the photo in figure 5. The dark cold outside versus the warm and welcome interior! This person is feeling good! It’s not the build that’s speaking; it’s the color of the light. If the scene was identical and the inside and outside lighting was swapped so the outside light would’ve been warm and the interior blueish and dark, the story would be different.
Framing is key
Filling the frame only following compositional rules is not enough if you want your photo to tell a story. It is really important to focus. As I wrote before, details can be important and contrasting elements increase the potential for storytelling. Yet, if you choose to add elements, it must be possible for them to come together in the minds of the viewers. If the viewers can’t figure it out, they get confused, and a story gets lost. That’s when you know you overdid it with adding details. Remember that what you leave out from your picture is as important as what you include! Completely unrelated information in your photos will only disrupt the stories in the image. Always ask yourself if each element in the photo helps tell the story.

The photo in figure 6 shows that sometimes you don’t even need any elements at all. I used framing, lighting, focus, depth of field and a close-up to tell a story. Adding any other element to this photo would’ve diluted the meaning of the image.
Get to know your subject
Sometimes a photo is created featuring a subject that needs over one image to tell a story OR a subject that has a lot more than one story to tell (and again; the subject can be anything, not only a minifigure). If this is the case, you might consider creating a series of photos, avoiding trying to put too much in a single image. By creating a series of photos; a whole new world might open up. This time I don’t mean comics. I’m talking about showing different perspectives on a single subject, thus creating a whole new, deeper level of storytelling.
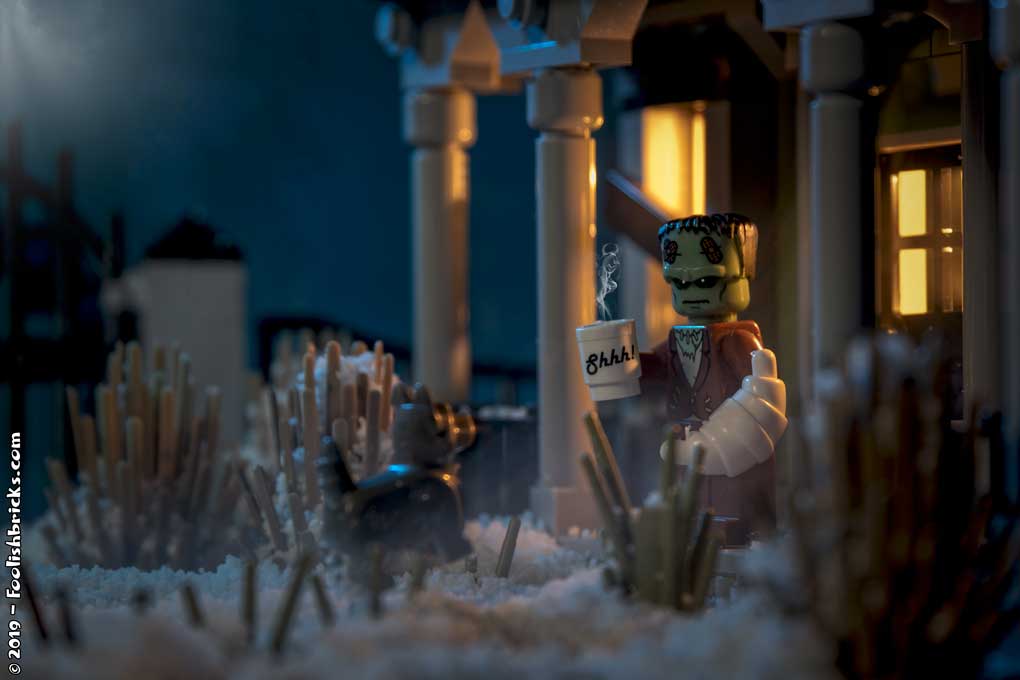
I consider the image in figure 7 a pleasant image showing Frankensteins’ monster enjoying some quiet time with his dog in the garden of his cozy home. However, the story it tells differs and might get to another level if you know who this monster actually is in the world I created for myself. The people that read the comic also know this is Dwaas, a lonely monster living with his ghostly friend Kemi. They also know he loves molded croissants and brings up the mystery of who this dog might be.
Be original
Nothing kills a story more than seeing an image that essentially has been created a thousand times before. Viewers are exposed to many photographic stories each and every day, and the photos that stick are the ones that do NOT follow the obvious path, just look at figure 8 (source: insta_repeat). Might be a great photo in itself… but when people have seen it a thousand times before; not so much.
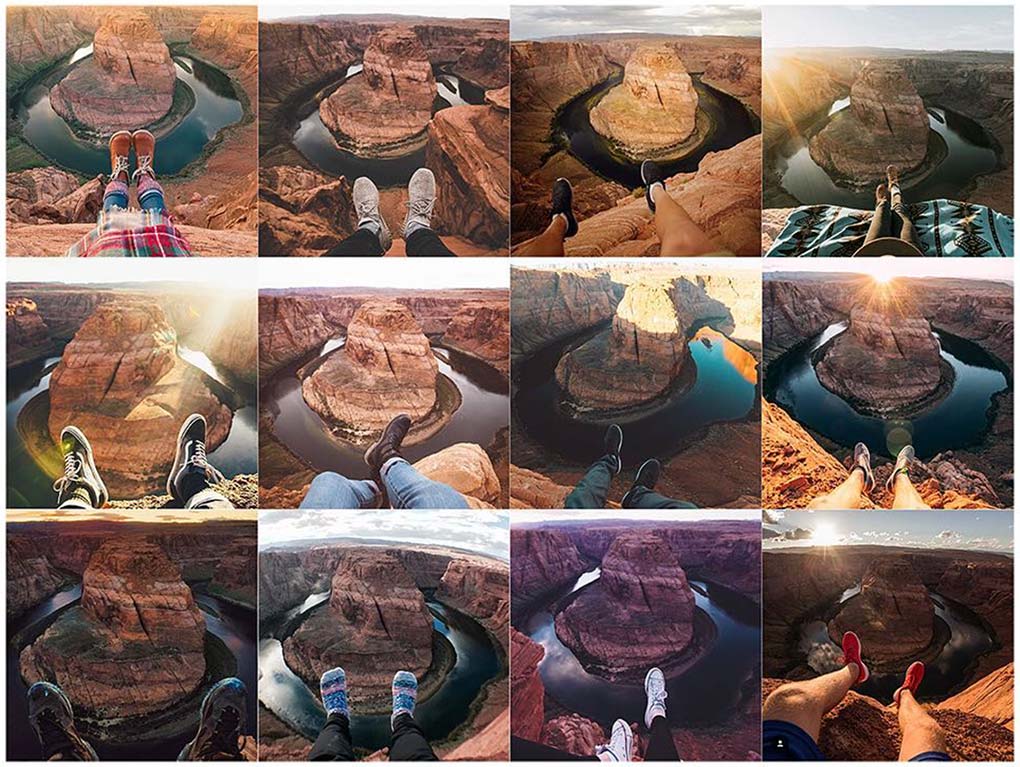
You might have heard about the Pixar rules on storytelling. One of these rules is especially appropriate in this context: “Discount the first thing that comes to mind… and the 2nd, 3rd, 4th and 5th, surprise yourself!”. This tip might seem very obvious, yet the amount of relatively similar (Lego) photos out there might surprise you. These more-of-the-same-images fail to surprise and engage the audience. Their story has been told too many times before and no one will remember another photo that looks like the one before.
In conclusion
Storytelling through Lego-photography is hard. Especially because our little plastic friends make it more difficult to convey emotions. I hope to have provided you with a few tips and tricks to get the viewers thinking about your image, thus, creating a memorable image. For now, my last two tips on this subject are; be careful naming your image, because a name could guide away the viewer from a story if you’re not careful. And last, create technically perfect photos! People tend to get distracted if there are obvious – non-intentional – technical difficulties with a (Lego-) photo.
In the next article, I’ll discuss techniques that will greatly increase the capability of a photo telling a story: Guiding the viewers’ eye!
Happy creating!
OTHER POSTS THAT MIGHT INTEREST YOU;
The Bookstore
February 7, 2021
Behind the scenes: “Nature photography gone wrong”
September 30, 2018
Lighting a scene; white-balance part 1
February 22, 2018
You can subscribe to the newsletter to receive occasional updates from Foolish Bricks.


You gave many tips and points to hold when make own pictures and tell own Lego character’s story’s.
You made wonderful and awesome work. Thank You You share with us they different tips and tricks!
I’m very glad You got new good motivation…..new adventure in Brickcenter.
Now it start coming more great tips.
I looking forward they.