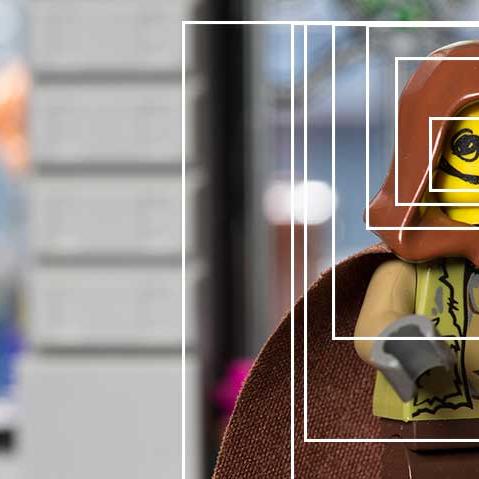
Behind the scenes: "Good old times"
behind the scenes
This is a behind the scenes post for the Lego photograph: “Good old times“.
Planning the Lego photo
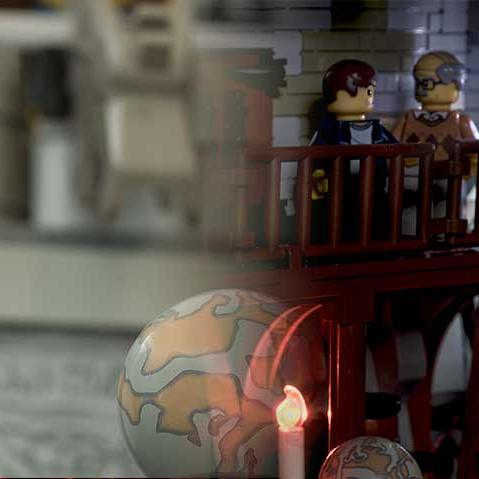
This time I was looking for a happy emotional scene. And again, I wanted to try something complete new to me. I had seen a lot of toy photographers use photos as a background. Up until now, I never did. I always feared it would look too artificial. Yet, a few months back i did print a few backgrounds… to be put in a drawer unused. One of these backgrounds was a sunset. The sunset struck a cord. It got me thinking of a couple walking into the sunset. For some reason an earlier toy photo of mine entered my mind: “Lonely old man“. That brought me to the decision to use an elderly couple.
Contrast in the title
Some of you might know I like some kind of contrast in my photography. I did not see any contrast in this image. Instead, the contrast is a little hidden in the title combined with knowing about the “lonely old man“-photo. Good old times can refer to the good times these two ‘old’ people are experiencing, making this a happy image. Yet, it could also be the lonely old man remembering the good old times…
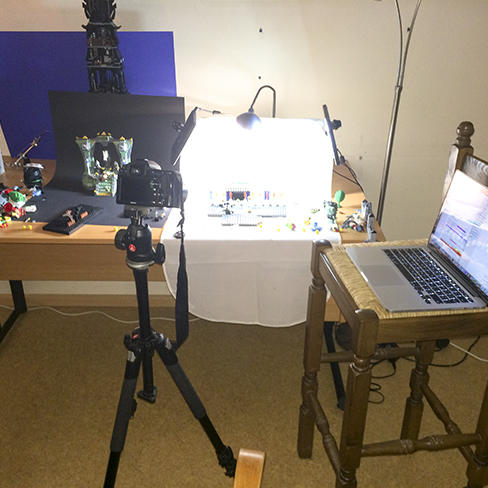
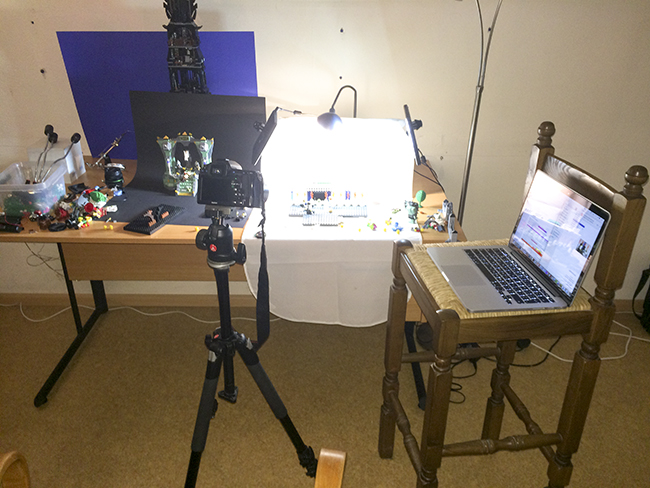
Setup
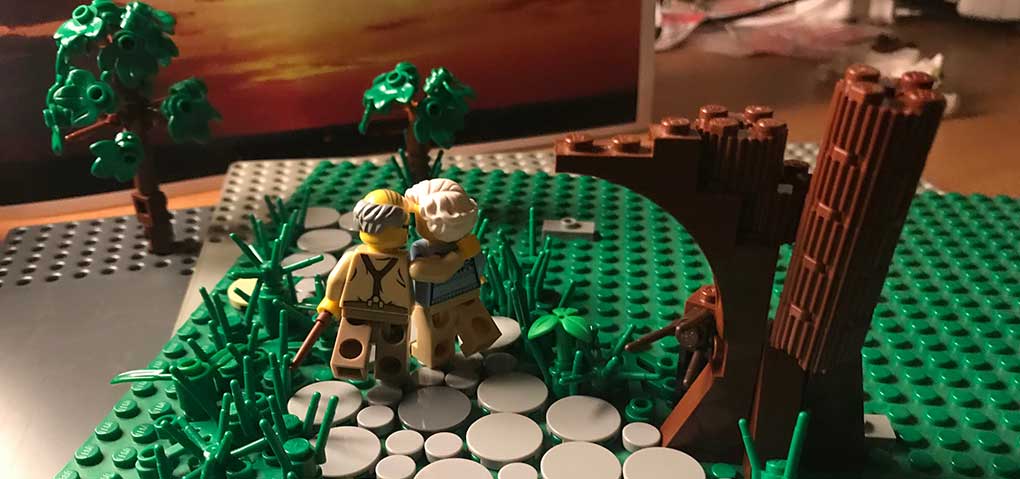
As stated I used the sunset picture as a background. Lighting could also be relatively simple this time. One light as far to the front as possible. Because I did not succeed in putting it directly in front, I put it to the side a little as shown in figure 1.
The plates to the side serve two purposes; first and foremost they prevent direct light from entering my lens. Second, they regulate the lights/shadows on the trees and couple a little.
Building the scene
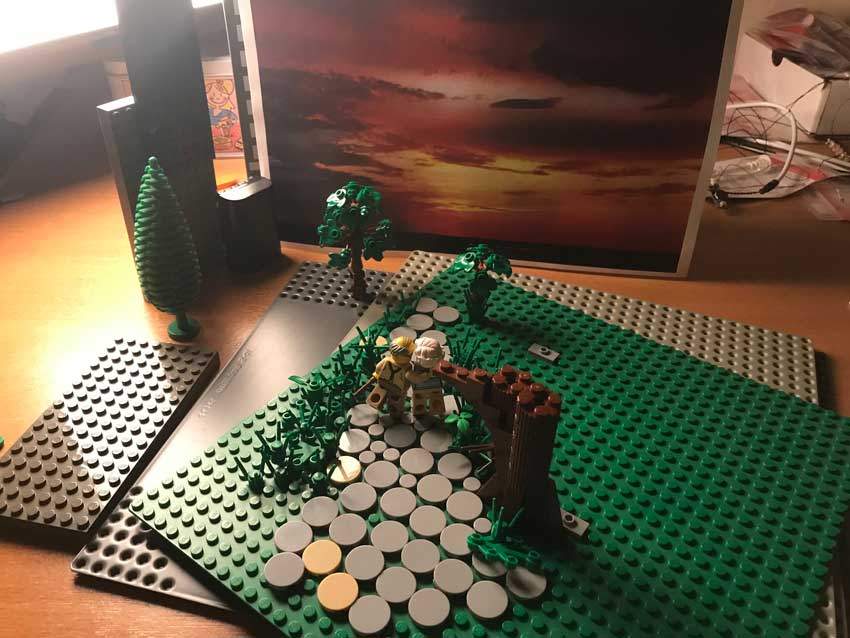
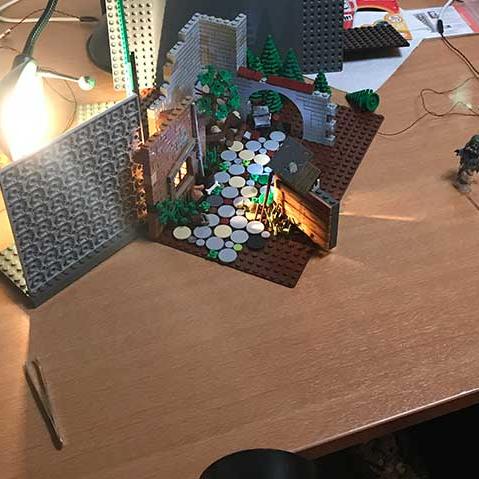
Typically I build the scene before I do the setup. This time I Used the path from the ‘startled guard‘ image and put the couple on there as he center of the image. Next i placed the camera, framed and lighted the scene. Only then I started to build the scene, constantly looking through the cameralens for the effect of everything I added. I did something like this before in the ‘back alley ghost‘ image and again I was surprised at how few Lego bricks were actually needed to fill the scene as you can see in figure 2.
Take a special look at the trees. The small tree in the back right was used for adding a little depth. Because of the contrast with the much higher tree on the left, it looks as if the tree on the right is much further away than the one on the left (forced perspective).
Also take a look at the ugly big tree in front. I could have build a stunning tree, correct and beautiful. However, it would’ve never shown in the photo. Because I was a little short on time this tree was build brick by brick, looking through the lens for the effect of every brick. The illusion of a normal giant tree is there (I think).
The shot and post-processing
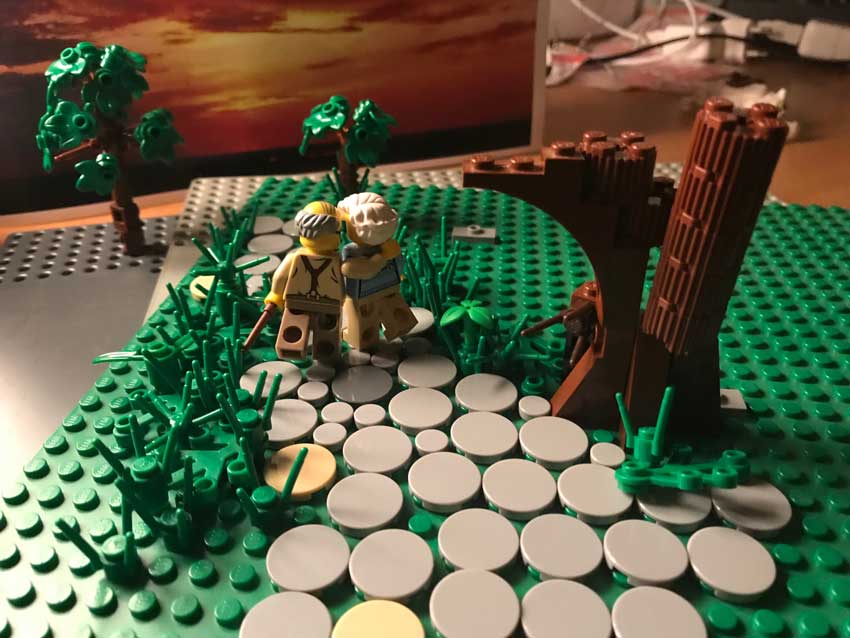
I took the shot with a f100 mm Pentax macro lens at ISO 100, aperture f/5.6 and shutter speed 1/60. In post-processing i added vignetting and adjusted the levels a little. The resulting image is below.

In the end, I am not completely happy with the effect of the background. It looks… well… like a photo in the background. I’ll have to see how I can refine the technique, so if you have any tips, I’ll be happy to hear them. Have you ever used photographs as background in your photography? How did that work out?
OTHER POSTS THAT MIGHT INTEREST YOU;
You can subscribe to the newsletter to receive occasional updates from Foolish Bricks.
Behind the scenes: "Hope"
behind the scenes
This is a behind the scenes post for the Lego photo: “Hope“.
Inspiration
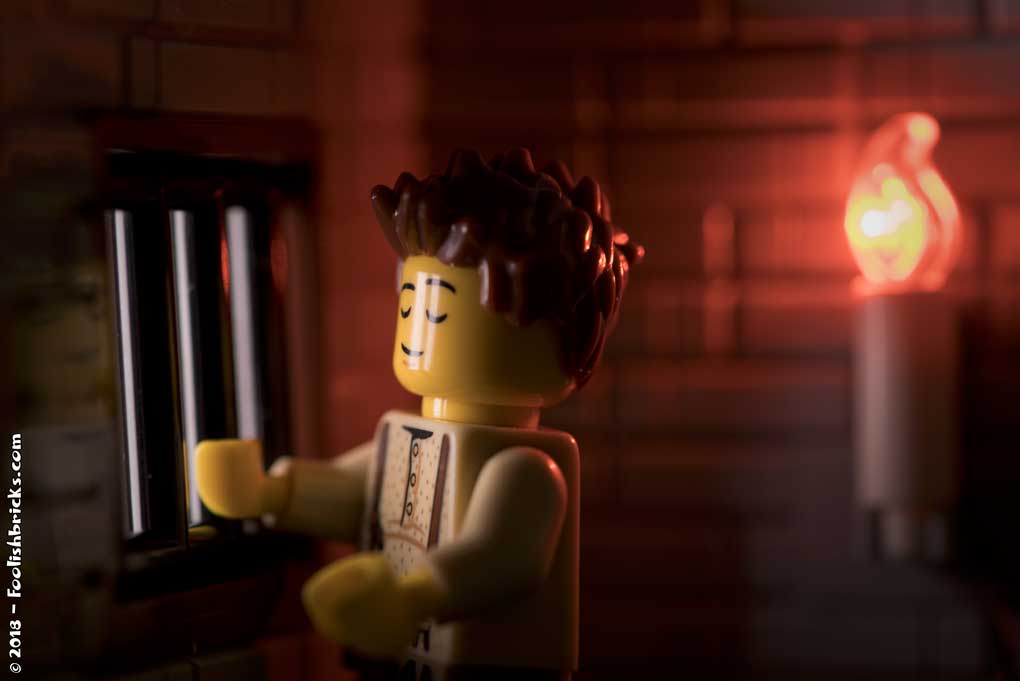
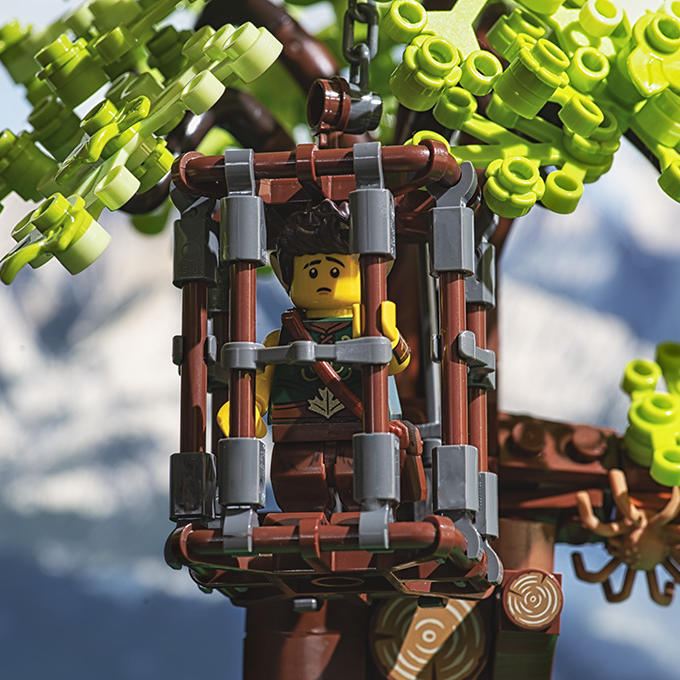
For this image I wanted to capture a dark image wherein light would play the starring role. I would’ve liked an image that was dark in nature, yet with a glimmer of happiness, serenity or hope. After some time I decided to work with a prison image, with a prisoner showing some kind of peace with the situation.
Setting up the scene
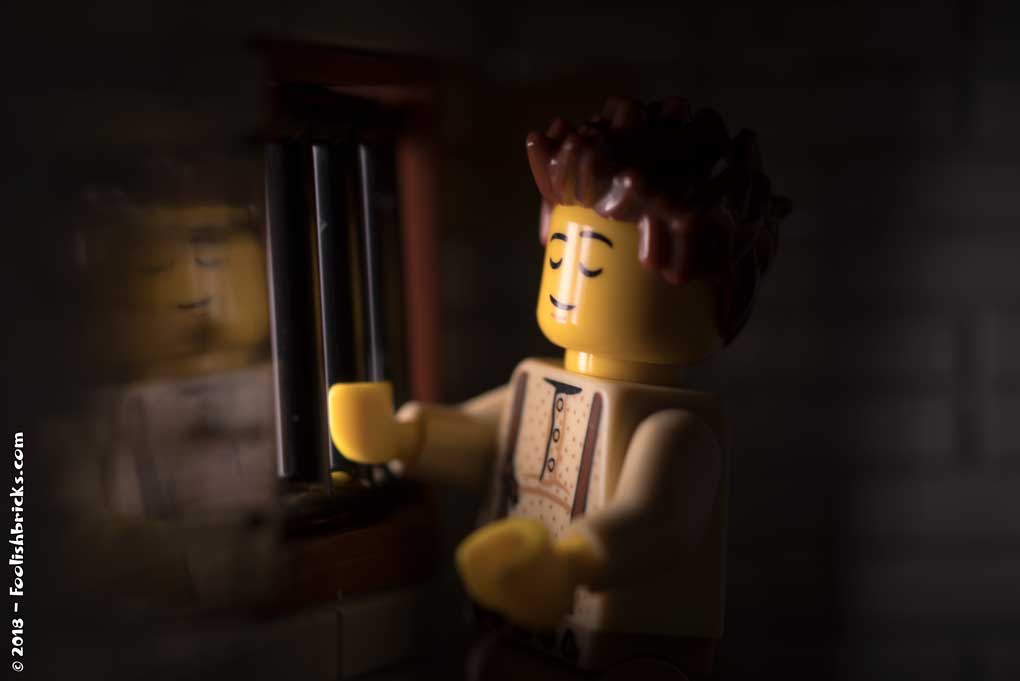
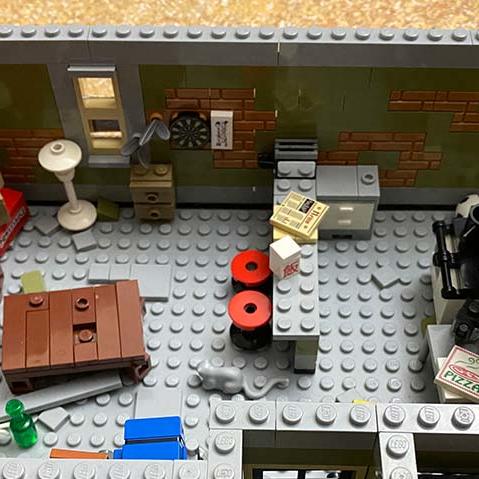
The final image changed quit a bit from the first concept in my mind. I build a small prison corner and put the minifigure directly in front of the barred window so the warm yellow light could shine on half his face. I used the sleepy head so it would look asif the imprisoned minifigure would seem to be silently enjoying the warm rays of sunlight with his eyes closed, remembering better times.
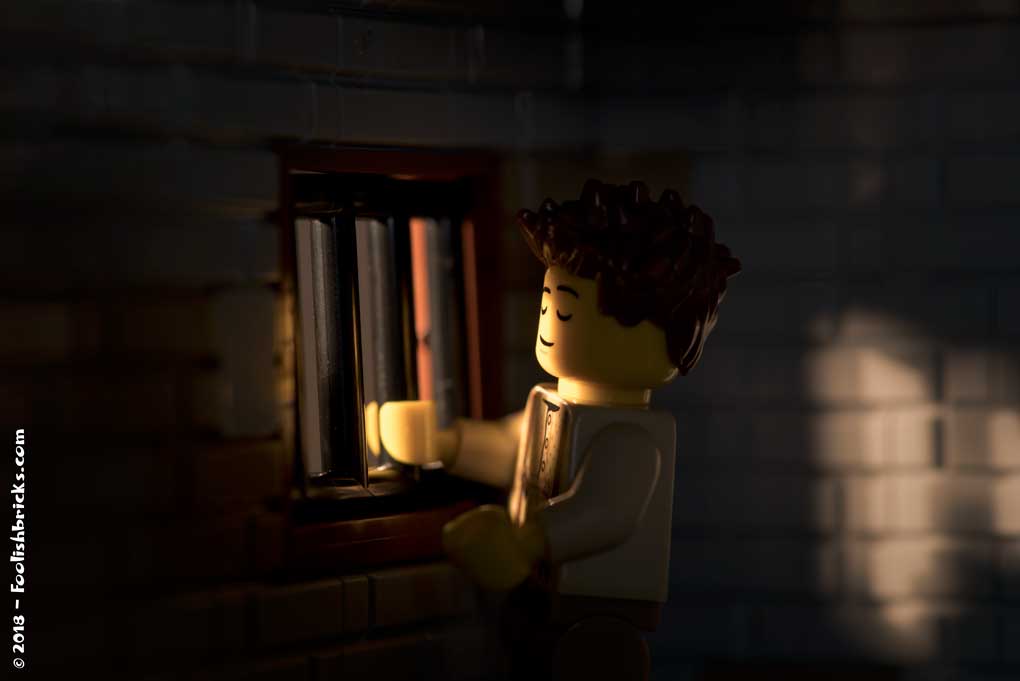
That did not work quite as well as I hoped. Because the minifigures have flat round heads, all contrasts that could provide depth in his face got lost. Also, you couldn’t see anything from the inside of the prison because of the darkness behind the minifigure (figure 1).
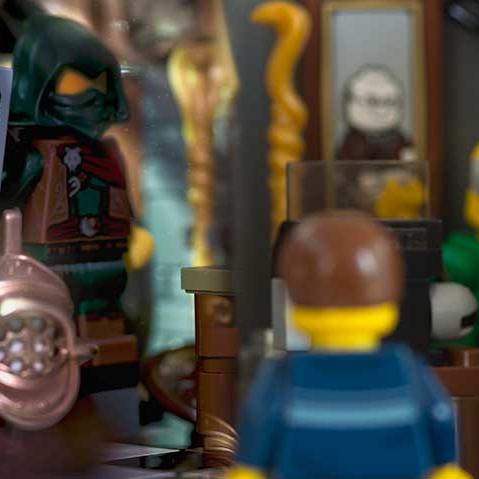
I tried adding a second light behind the prisoner, but that looked really artificial and unbalanced. I needed some kind of light source behind the prisoner. Next I tried a candle on the wall. This could’ve worked, yet, I wasn’t looking for contrasting light sources, so I removed it again (figure 2).
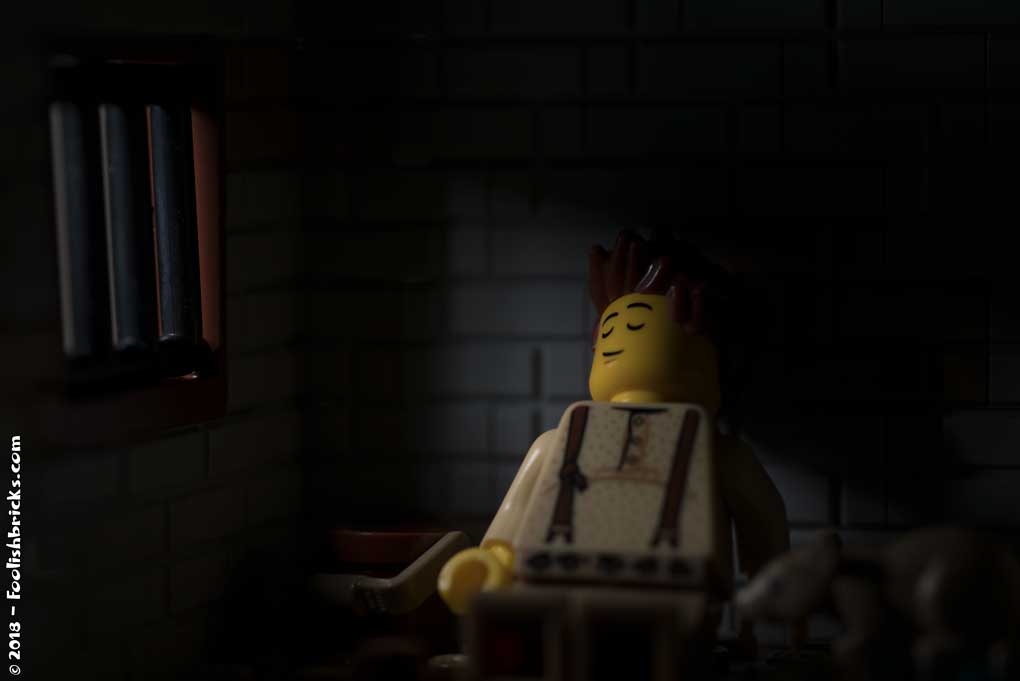
There was more of the prison in the image, yet, there was too much focus on the barred window itself. I needed the focus on the prisoner (figure 3).
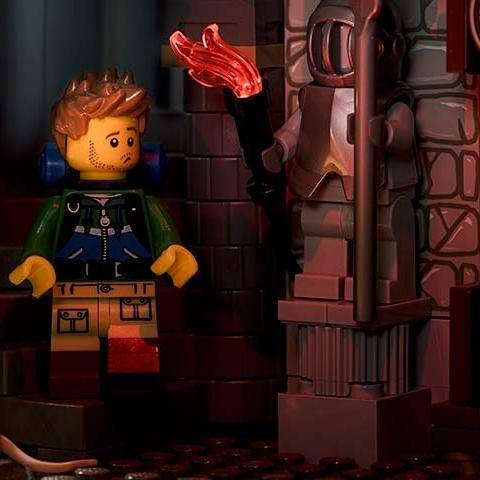
Then it struck me; I simply had to move the prisoner away from the window! This way I could use the natural light hitting the prisoner AND the wall, I could use the structure of the whole minifigure for depth and I wouldn’t need a second light source. So that’s what I did. I added a few smalle details, like the bucket and (of course) a rat. That was it.
Technical
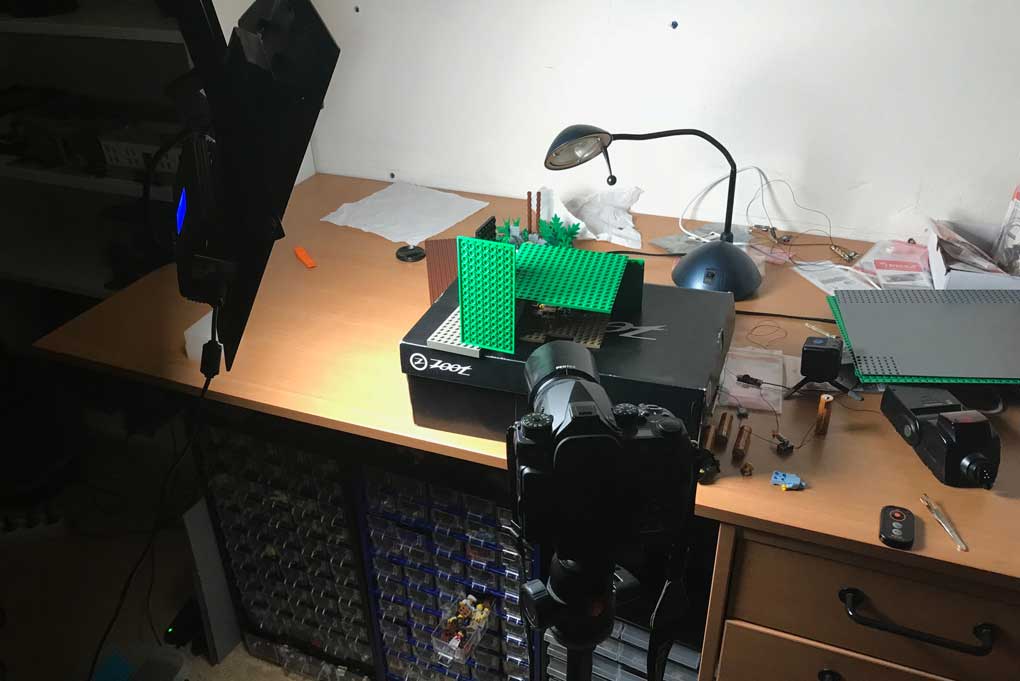
You can see the final setup in figure 4. You’ll notice the large plates outside of the walls. This is something I do in almost all my pictures and keeps the light from bleeding through the slits of the Lego blocks of the wall, especially if the light is shining perpendicular on the walls.
Post-production
This photo didn’t need that much work. The only thing I did was lighten op the whites and shadows in camera raw (photoshop) a bit. The before and after is below.

OTHER POSTS THAT MIGHT INTEREST YOU;


You can subscribe to the newsletter to receive occasional updates from Foolish Bricks.
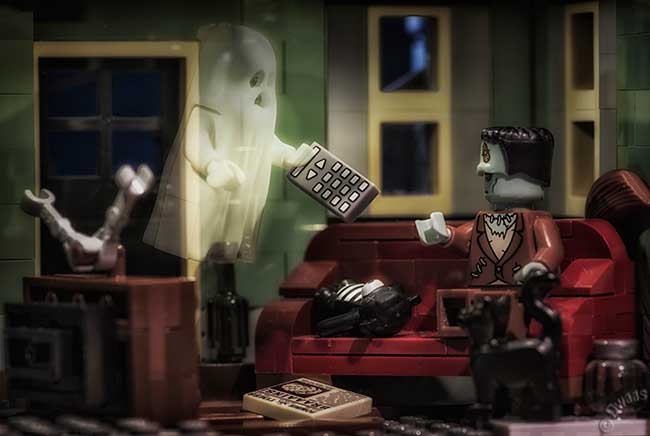
Behind the scenes: "Back alley ghost"
behind the scenes
This is a behind the scenes post for the Lego photo: “Back alley ghost“.
Inspiration
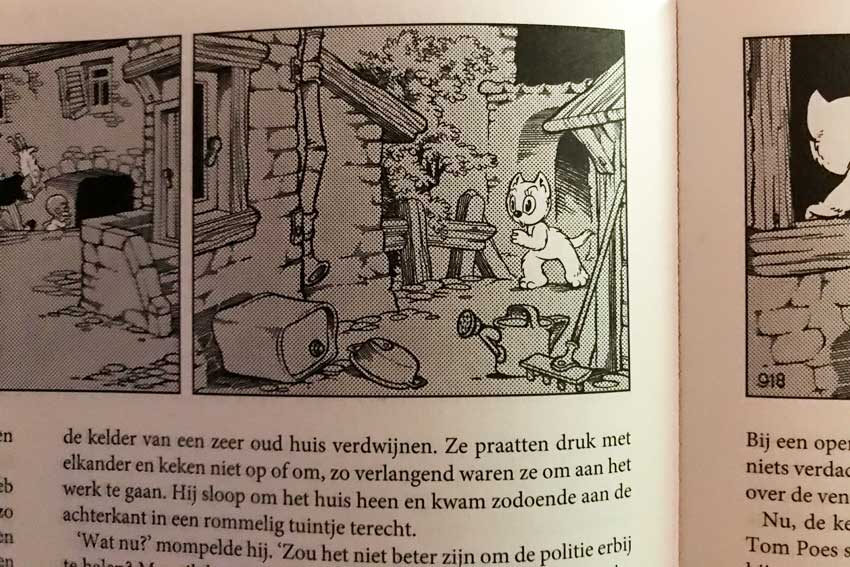
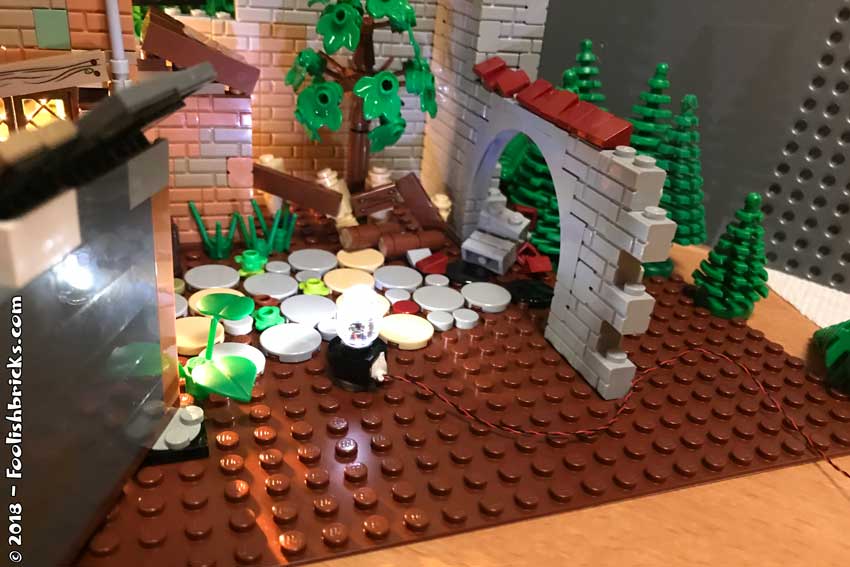
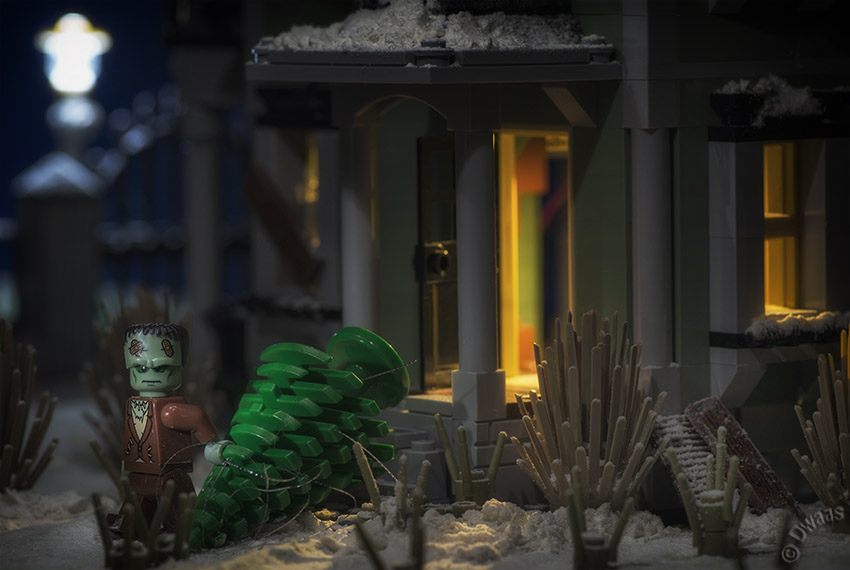
Inspiration for toy photography can arise from anything. The past few years I’ve been reading all the stories of Tom Puss (Dutch readers will instantly know who this is). One of the stories, “Kwetal de Breinbaas”, published in 1949 had a panel which immediately struck my eye. As you can see in figure 1, the inspiration for the back ally photograph came from one of the panels in that comic.
Setting up the Lego photography scene
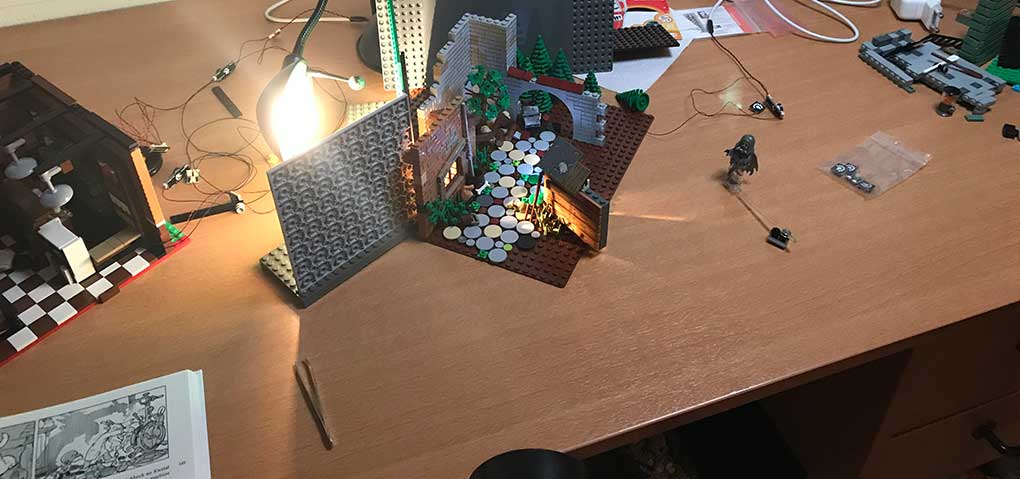
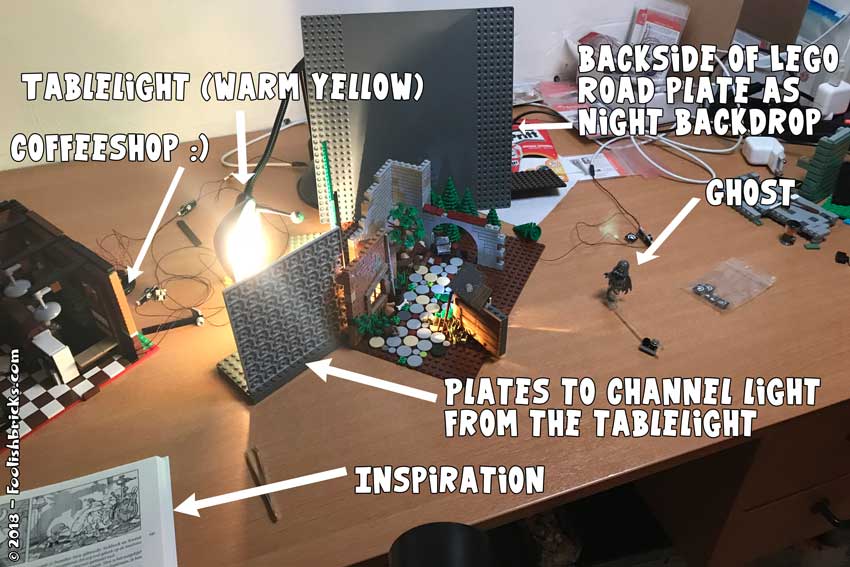
The basic Lego setup can be seen in figure 2. Pretty straightforward.
While building this Lego stage, I kept my camera close, so I could check and see if what I’d build was large enough. This way I could keep the building to a minimum.
Lighting the scene
It was to be a night scene. At night the main light source is usually the moon. So way up in the air I put my LED-panel at low light and at a color temperature of 5600 K (I used the same panel overhead in the coffeeshop-scene). Furthermore, I wanted warm light from the window as a means to light the front part of the image. In figure 2 you can see I used a simple tabletop light for that purpose. To keep the light from leaking into the scene, I used a few Lego plates to block the light where I did not want it.
Lastly, I needed a subtle lighting of the back part of the scene. If I made the moon too bright, it would have washed out the front warm light, so I put in a small LED light from Brickstuff behind the shed-wall for this purpose (figure 3).
Populating the Lego stage
Though Tom Puss is prominently featured in the comic book scene, I did not want to put in a cat(like) person. I’ve been looking to feature Dwaas in one of the images so I first tried to put him in there. You can see some examples in figure 4,5 and 6.
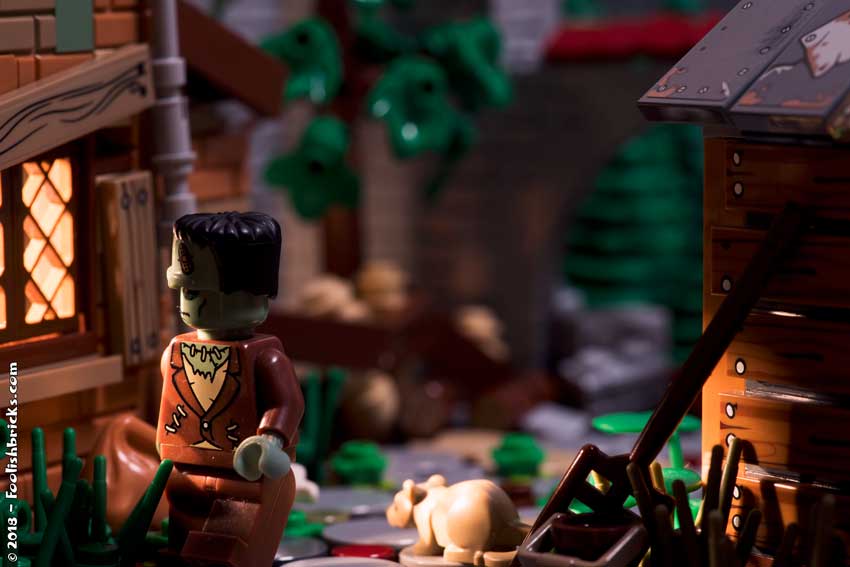
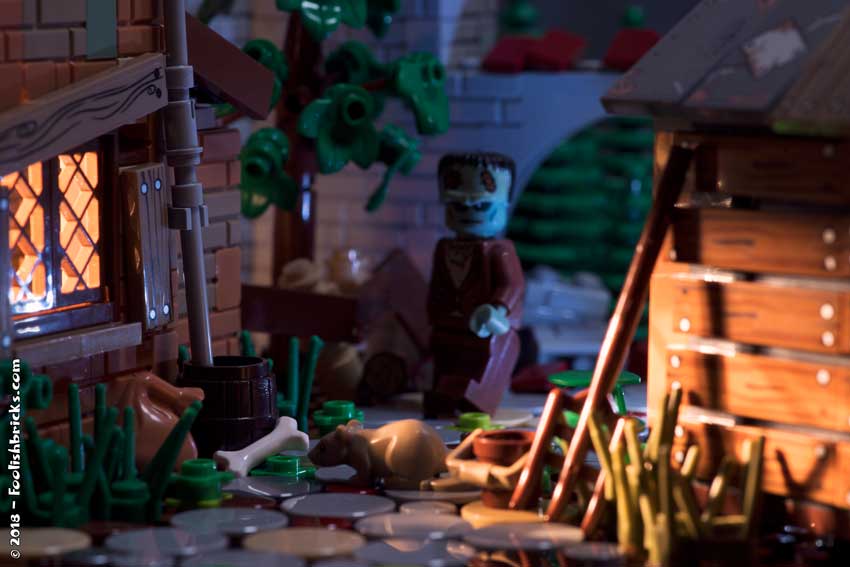
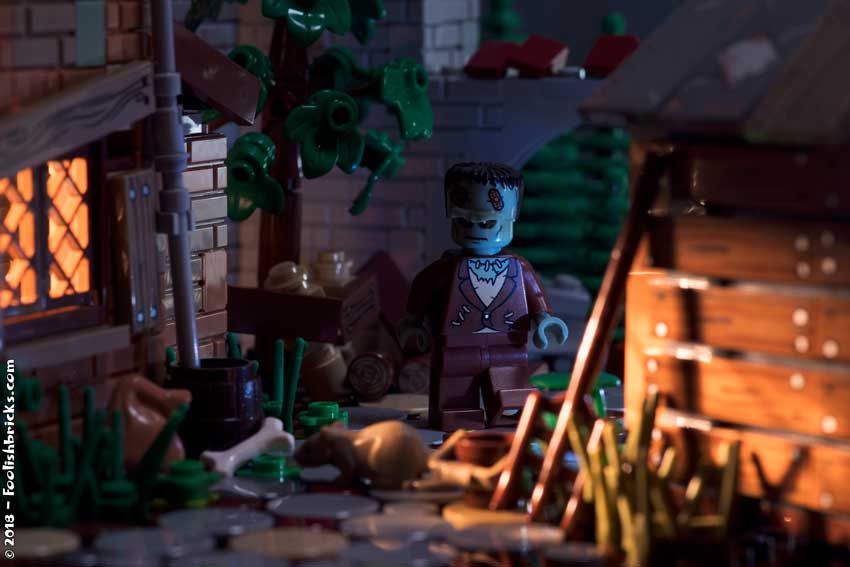
Yet, for several reasons, I did not like the result, mostly because Dwaas blocked quiet a few parts in the scene or Dwaas pulled too much attention from the scene as a whole. So in the end I decided to add a subtle ghost. By the way, now that I see them again, I kind of like the first of these three images to be honest. 🙂
Post production
Of course I added the ghost to the image. You can see him standing on a Lego stick in Figure 2. I used a similar technique to the one used for the ‘into the sky‘ Lego photograph.
Lastly, I deepened the colors a bit and added some contrast. The resulting Lego image is below:

OTHER POSTS THAT MIGHT INTEREST YOU;

You can subscribe to the newsletter to receive occasional updates from Foolish Bricks.
Behind the scenes: "Coffeeshop"
behind the scenes
This is a set I build specifically for the Foolish Lego comic. However, it was such an elaborate set I wanted to create at least one high-end picture too. To be more specific, I wanted to see if I could light it as close to reality as possible. This behind the scenes post will specifically be on the lighting of the ‘coffeeshop’ Lego image.
Lighting the scene
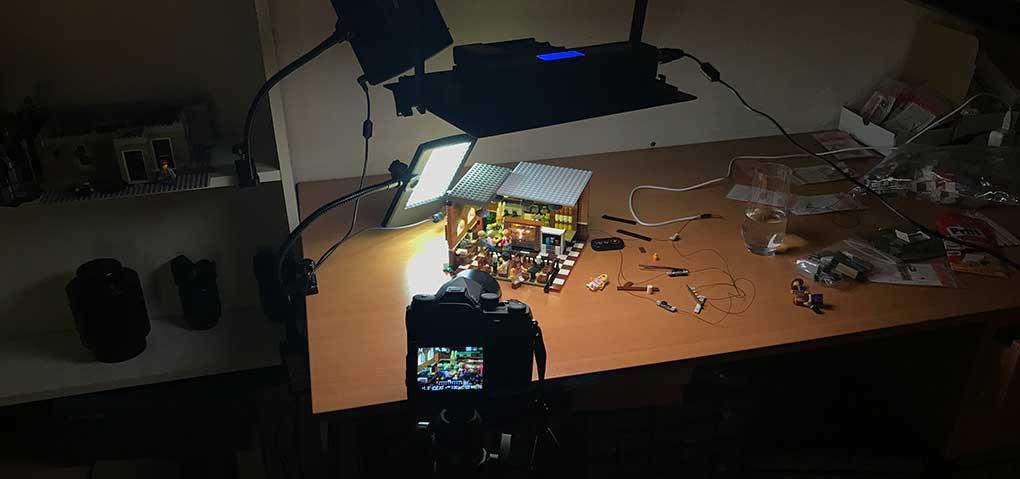
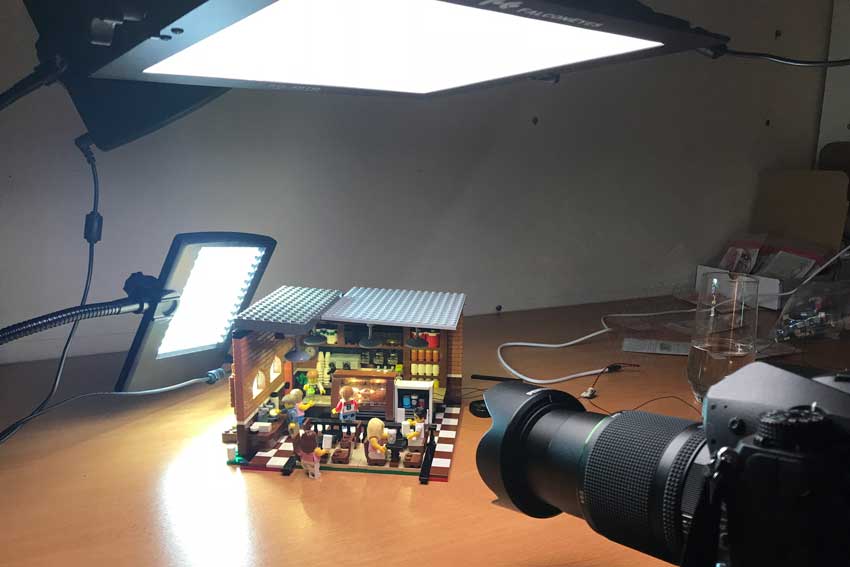
Mostly I like to have at least two color temperatures in an image because I like the subtle contrast. In this scene you’ll see different regions with somewhat different temperatures somewhere between cool and warm . First I wanted to take care of the main light-sources; the light falling through the windows and the ceiling-lights. This part actually consist of three lighting sources. The ceiling lights over the counter are from a wonderful company called Brickstuff and emanate a warm yellow light (figure 1).
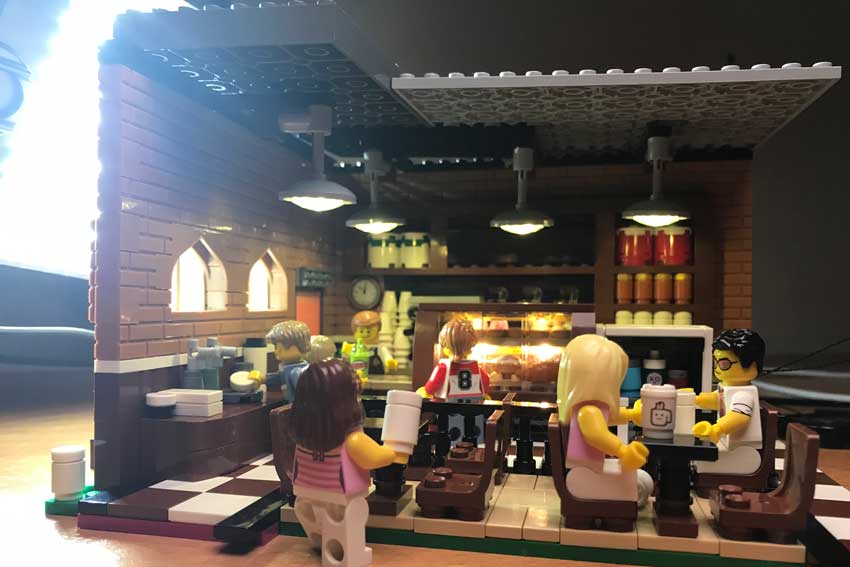
The light through the windows is from a harsh, cool LED-light, coming slightly from above because the sun would come from above at this time of the day (the clock in the corner reads 11:50 AM 😉 ). The customer-area was underexposed, so I added a third (soft) cool LED-light, whilst also blocking this light over the counter-area with a few large plates, so I would not lose the warm light at the counter (figure 2).
Smaller lightsources
As you can also see, the pastry cabinet is lit. For this I used two strips, each consisting of two warm yellow LED-lights (Brickstuff). These two strips are fixed with a little tac (figure 3).
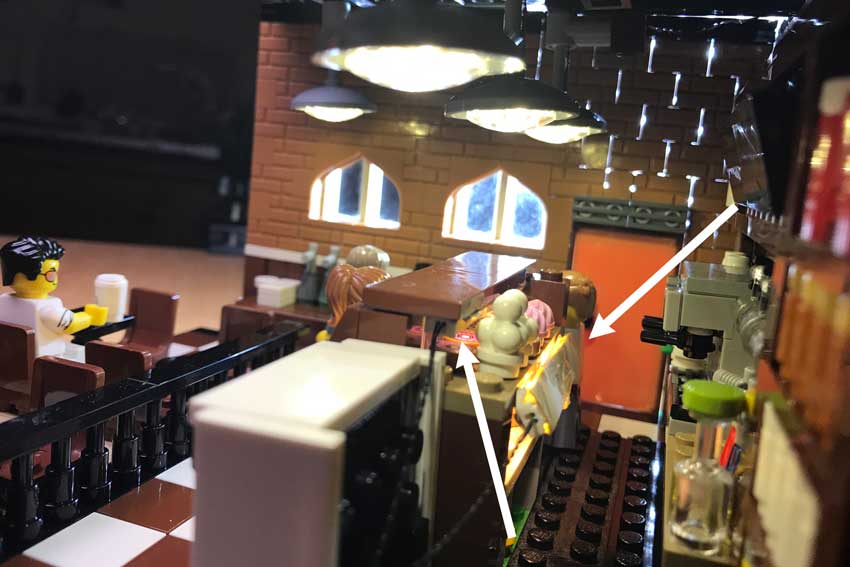
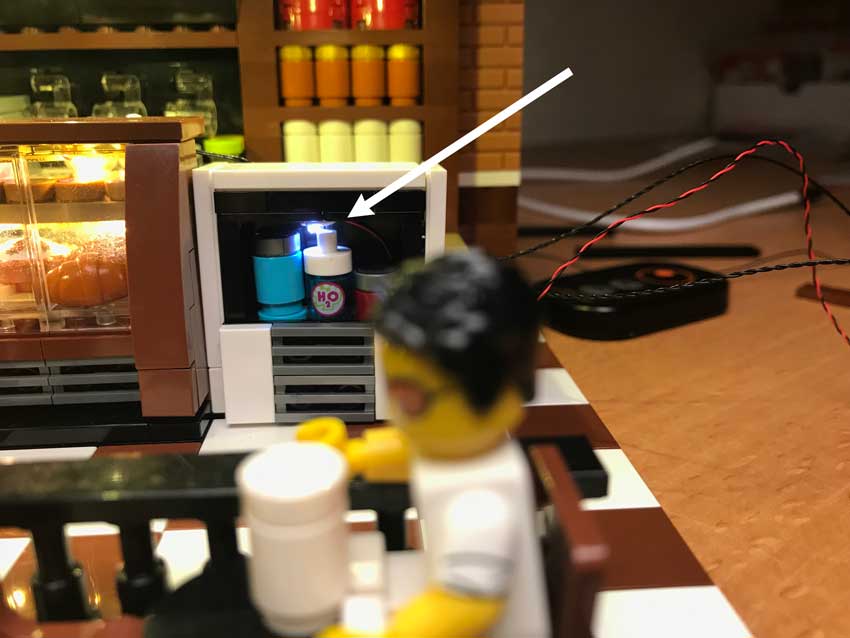
Lastly, I needed a light in the fridge. This one could be better, but I had too little space to fix get more lights in there. Anyway, I used another Cool white LED light from Brickstuff (figure 4).
Final touches
Then Icarefully placed the Lego minifigures. I wanted to create the illusion of a busy coffeeshop without accidentally blocking interesting scenery with the minifigures. That was a challenge, yet, I feel it worked rather well.
I shot the whole scene with my Pentax-K1 at f105 mm (focal length), f/20 (aperture) 1,30’ (shutter speed) and ISO 100. In post-production, I deepened the contrast a little and added a few subtle light beams.

That’s it! The final Lego image: ‘coffeeshop’, is done.
OTHER POSTS THAT MIGHT INTEREST YOU;
You can subscribe to the newsletter to receive occasional updates from Foolish Bricks.
Behind the scenes: "Lazy Sunday Morning"
behind the scenes
To my surprise one of my images was featured on the Brothers Brick recently; “Lazy Sunday morning“. This is a behind the scenes post on that image.
The idea
As some of you might know, for several reasons, I am not a fan of building with Lego. This time however, I felt the urge to build a nice MOC (my own creation) for a photograph. I’ve been wanting to experiment with light coming through windows for ages, so that was the goal for this build.
Because I wanted the light to hit something I wanted the build to have textures on the walls, so I did not want to use flat surface Lego bricks. Also I wanted a warm apartment. To achieve this I used more brownish colors.
As narrative, I wanted to add all kinds of elements in there. First elements to show he’s relaxed; cosy sofa (modeled after a sofa I own myself (brown 😉 )) with a pillow so his nek won’t hurt besides a few books for relaxation (love that myself). In contrast some work-related stuff (his suitcase and closed laptop). He is also a man of travels (a map on the wall) and loves a bit off fantasy (a Harry Potter wand on the shelve). And so on.
As stated by in the review, there aren’t any fancy building techniques, however I was proud of one inventive part use: look at the fruitbowl, its the lower part of a Lego Ninjago mask 🙂
The set-up
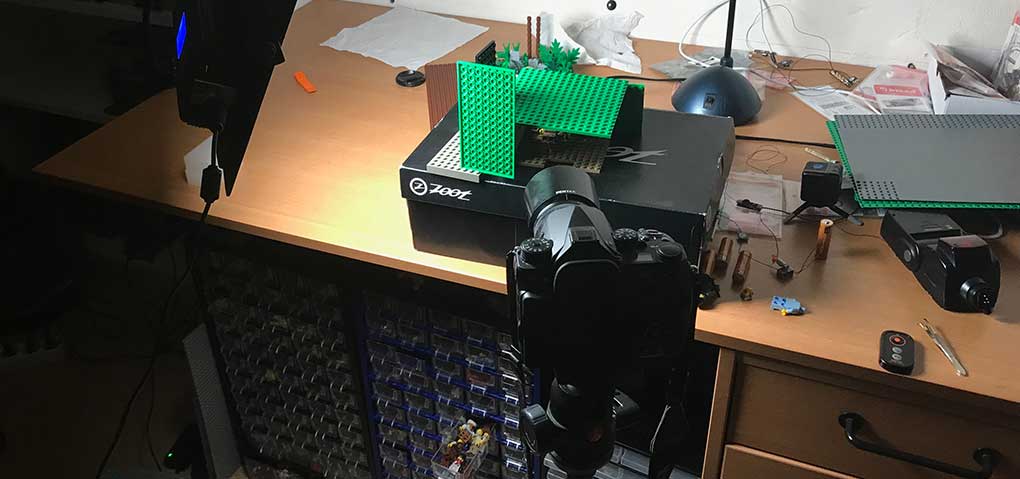
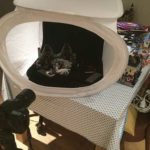
I have my mini-studio in the basement… but it’s a mess! As you can see in figure 1. So I had to shove some stuff aside to make room for my little apartment (the mayor’s office is in the back).
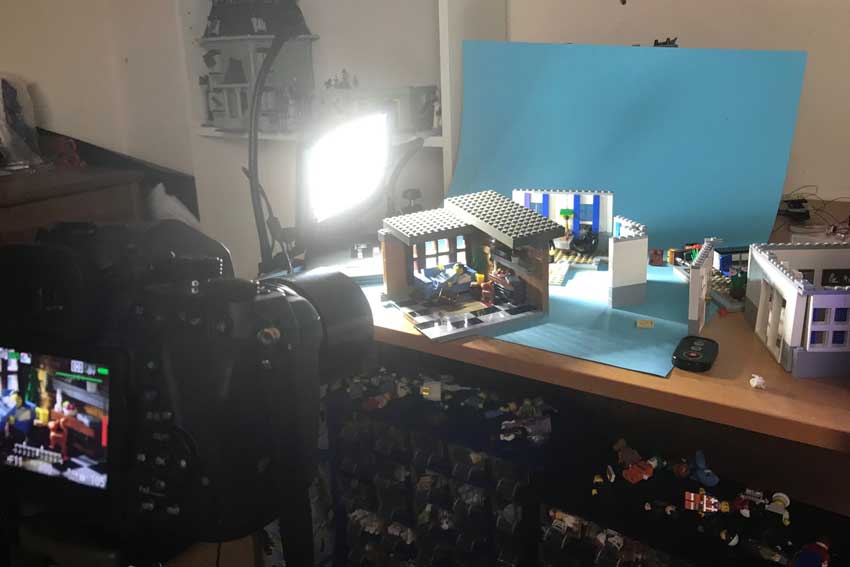
Besides that the setup is pretty straightforward; a large daylight lamp outside the windows and I keep dim light in the room to break the general darkness. I do not own a light with adjustable temperature yet, so I figured I could change the temperature of the light in post-production.
Furthermore you can see a camera-remote-control lying around (to lower the chance of camera-movement), and a little piece of paper-towl, to remove as much dust as I can see.
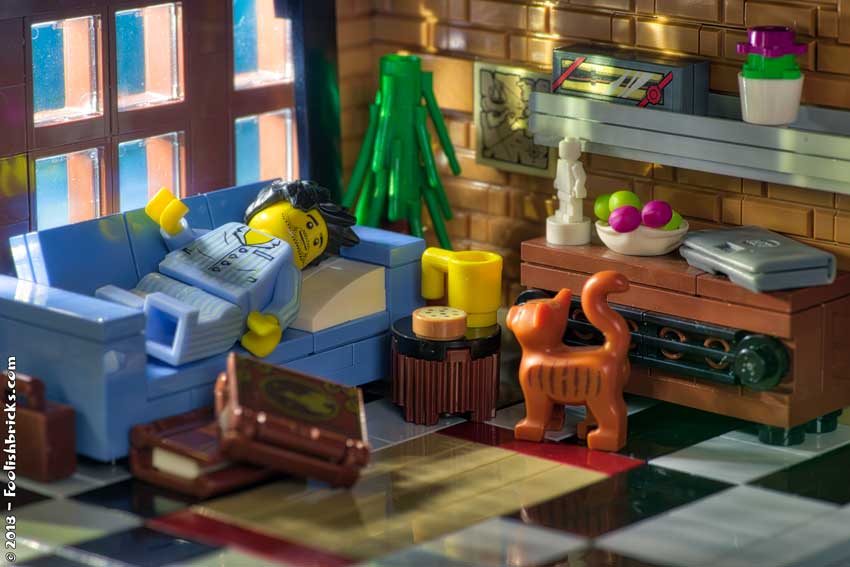
The original image
I used a Pentax K1, with a f100-macro-lens. The camera settings were: f/11, 2”, ISO 100. I always shoot my frames in dng-raw. Figure 2 shows you the original image. I wanted to get in really close, invading his personal space to make the viewers feel as-if they are part of the scene.
I shot quite a few frames before this image came to be… Cat not standing correctly, the light didn’t hit the walls like I wanted, the books reflected too much light, suitcase out of the frame, I knocked over some stuff trying to clean some dust away (and only noticed that afterwards), etc…
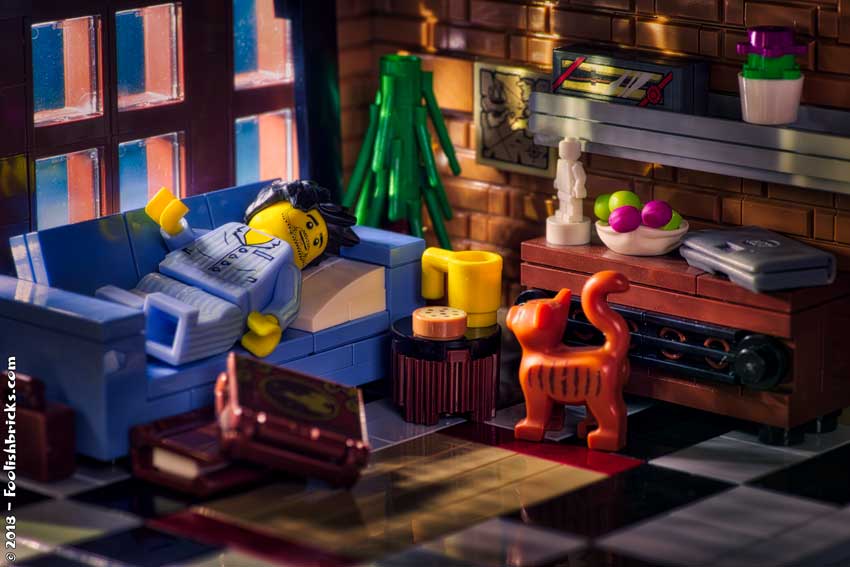
Post-production step 1; Cleaning up
There is always dust in my originals. The macro lens enlarges everything so much, that I don’t notice it with the naked eye… but it’s there. So the first step is digital cleaning. Besides, now I can also remove annoying reflections too! The result can be seen in figure 3.

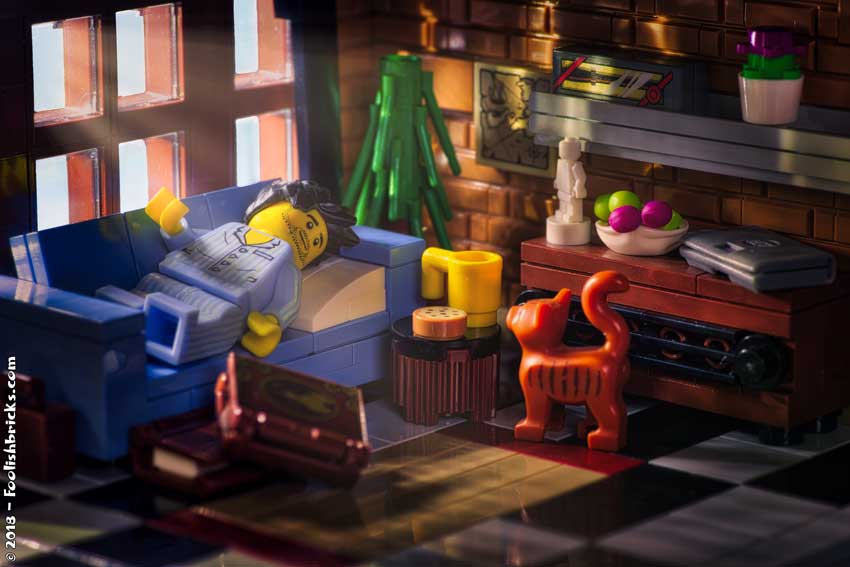
Post-production step 2; “Basic” adjustments
This part is the most extensive, and also a lot of fun. I experiment somewhat until the image looks like I imagined. I started in camera-raw, first adjusting white-balance (higher temperature and more tint), second I Adjust the exposure settings (selectively darkening and brightening different tones) and lastly a bit more clarity, vibrance and of course saturation). After these adjustments I use ‘dodge and burn’ and ‘levels’ to selectively adjust the image. The result can be seen in figure 4.
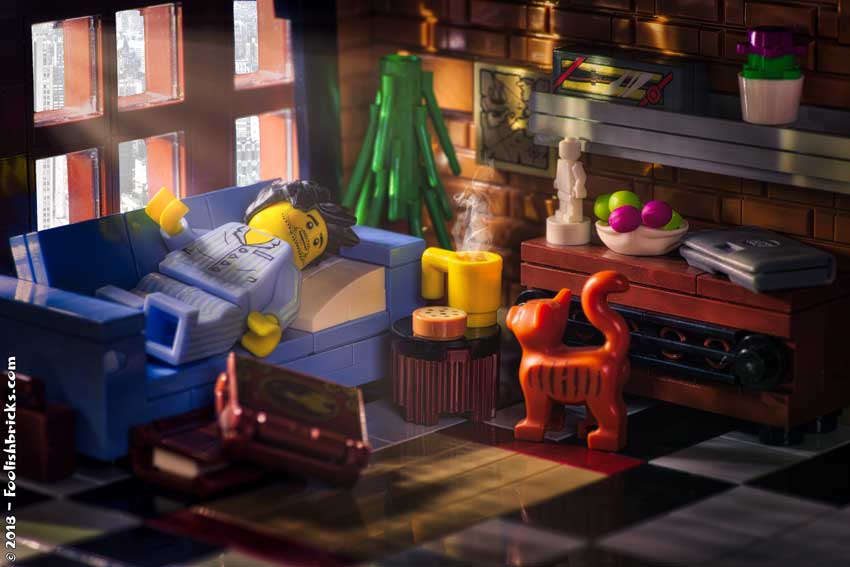
Post-production step 3; Light through the windows
The windows were lighten and light beams added. Afterwards I selectively lowered brightness, saturation and played a little with the ‘levels’-settings in the rest of the image. Look at figure 5 for the result.
Post-production step 4; details
I need my coffee in the morning, especially if it should happen to be a lazy morning. I also need that coffee to be hot! So I used a smoke-brush (you can find all kinds of free brushes on the Internet) and added some steam to the mug. Oh, and I cleaned a bit more because I mist specs in the first round of cleaning. The result is in figure 6.

Post-production final step; outside!
At first I figured I was ready. I even uploaded the image as it was. Still it kept bugging me! It was missing something. That something turned out to be the windows. They looked as-if they were taped shut. I wanted something outside the windows. To add some contrast to the cosy inside I decided to add a busy city outside the comfort of this guys home. I overexposed and undersaturated an image of New York and used a layer mask to place that image in the windows. Below are the original vs. final version of the image.
So, thats it! It was more fun than I thought and I expect to be building some more after this experience.
What do you think, is there anything you would have done differently?
OTHER POSTS THAT MIGHT INTEREST YOU;
You can subscribe to the newsletter to receive occasional updates from Foolish Bricks.
Behind the scenes; into the sky
behind the scenes
This is a behind the scenes post for the image; ‘into the sky‘. And though this image is not very difficult to create, it is useful to know how to make objects (or Lego minifures) fly in Lego photography.
Setup
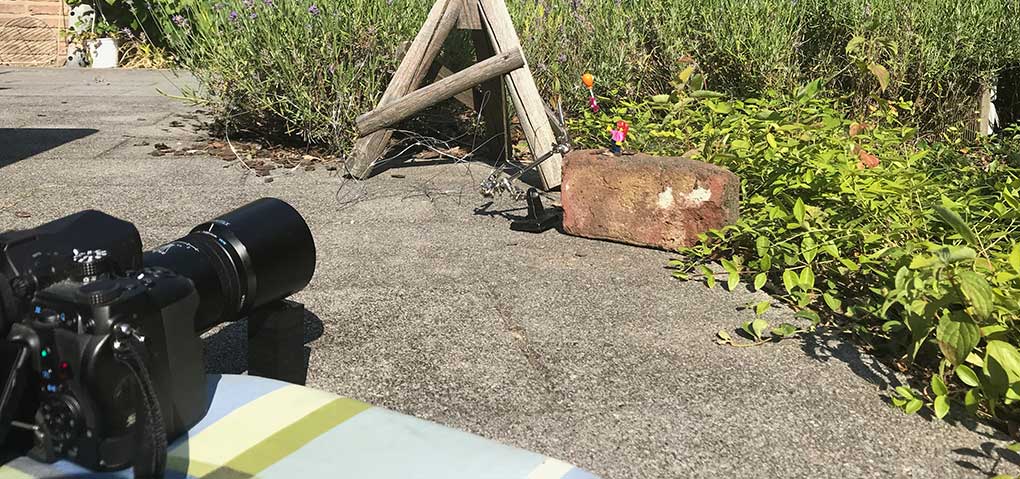
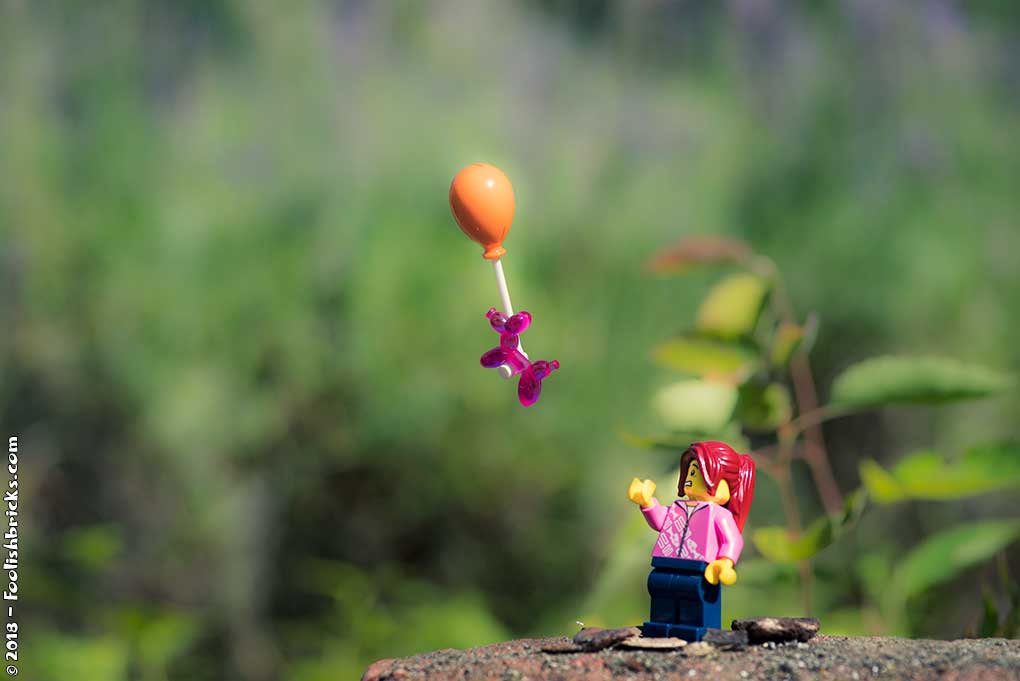
I wanted to create a scene with a balloon-animal flying into the sky hanging on a balloon after a woman lost it. Whenever possible, I go outside for a photo so the sun will take care about the lighting. The set-up is shown in figure 1.
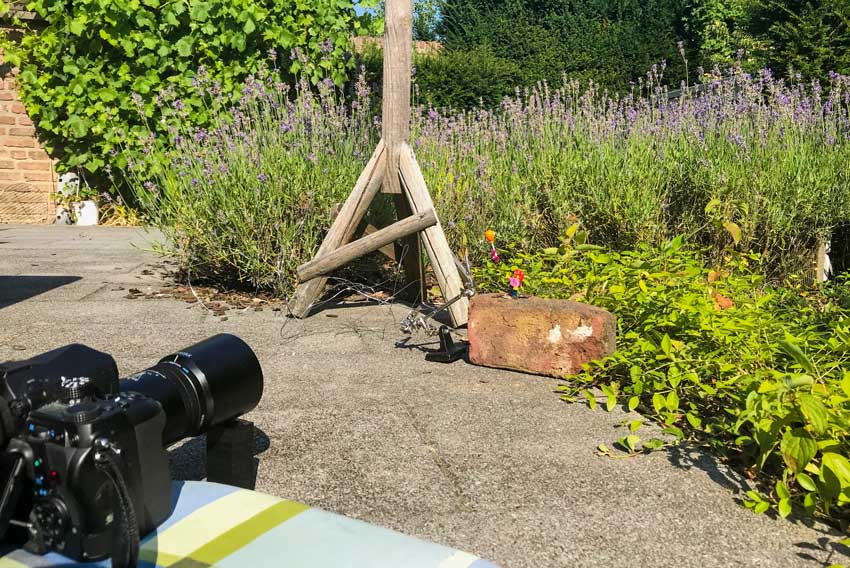
This time the camera is placed steady, this is important since I need two photos within the same frame (see later on). I use the remote control to take the photo after setting up the scene and adjusting the camera-settings. This will diminish the chances of me accidentally moving the camera between shots (like I often do 🙁 ) .
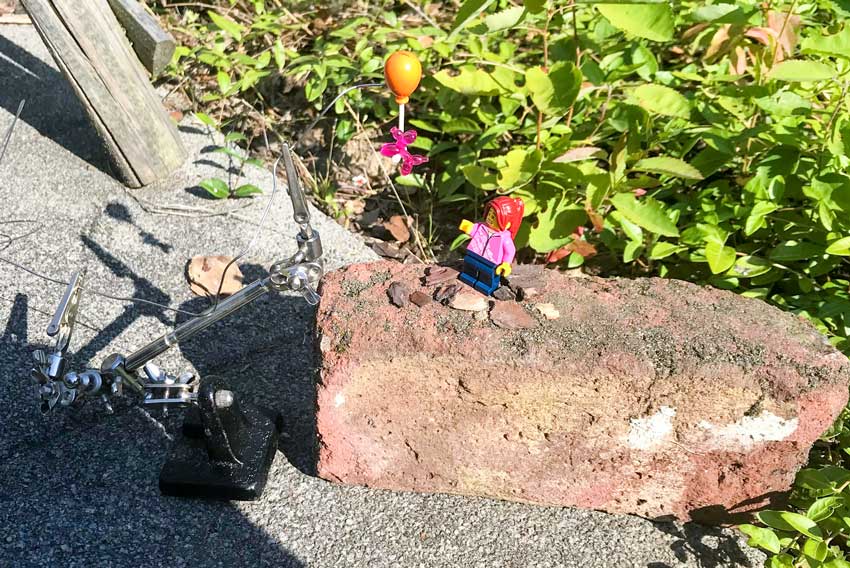

As you can see in figure 2 the balloon is attached to some wire to make it fly. Also the balloon-animal is attached to the balloon.
I use ‘tac’ (in the Netherlands this stuff is named ‘Pritt poster buddies’) for this purpose. Tac is very useful, I use it a lot, for example to stick minifigures to the floor when their center of gravity is such that they can’t stand on their own.
If you look at the image the Lego minifigure is bend a bit backwards to make her look at the balloon. This time it was not necessary to use Tac though. I simply placed the brick underneath at a slight angle so the minifigure wouldn’t fall backwards. The photo itself is shot from slightly underneath so you wont’t notice this angle in the final image.
Lastly, I take two pictures. One of the setup in figure 1, and one with the same setup but without the whole balloon. IMPORTANT: Be sure to set your camera-settings to manual for this, especcialy the focus. You’ll want the second image to be exactly the same as the first one. Also don’t linger to long between shots when you are outside. I often did and when I was ready for the second shot, the clouds moved in, completely changing the lighting.
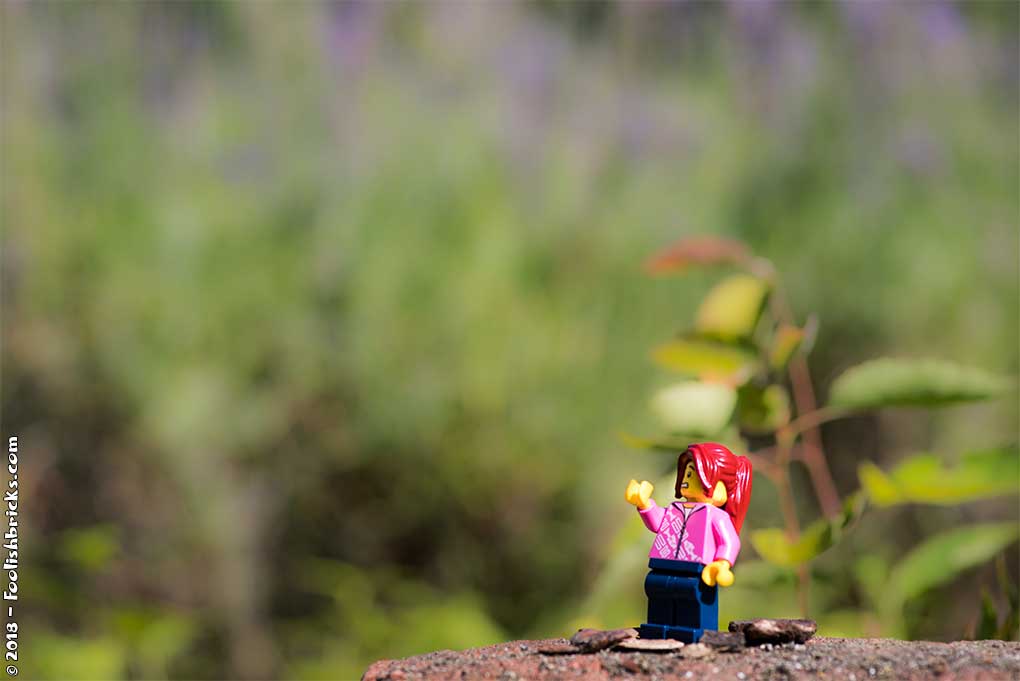
Out of the camera
Figure 4 and 5 show you the images straight out of the camera. I wanted the background to be substantially blurry so it wouldn’t distract the viewers from the central image. Eventually, the images were shot at ISO 100, shutter-speed 1/800 s and aperture f/5.6.

Post-production
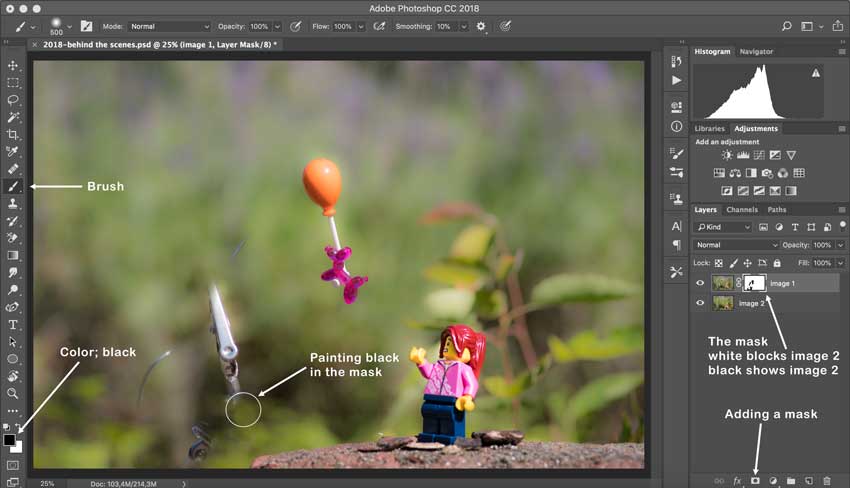
For post-production I always use Photoshop. I don’t know any other software from experience. However, there are (free) alternatives to Photoshop; the most well-known being GIMP.
In photoshop I performed a few steps.
- I put the images in one file in two separate layers. Image two is the layer underneath image one. Then I put a mask on the image 1-layer and simply paint everything I want out of the picture black in the mask, revealing the layer underneath (image 2). Figure 6 shows you the proces, figure 7 shows the result.
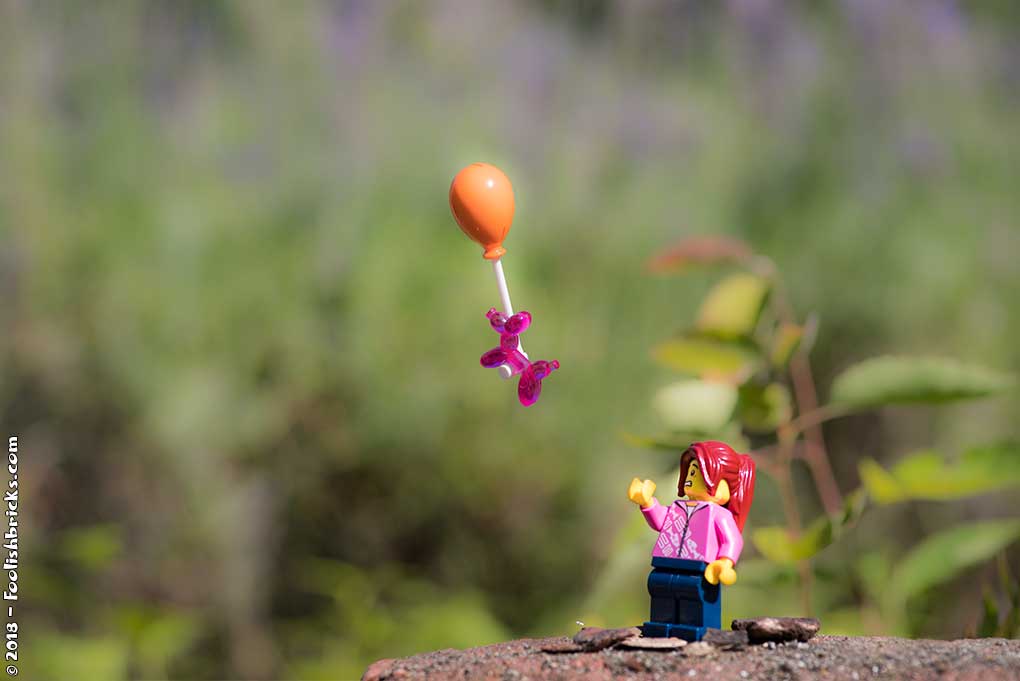
2. I accentuated the green colors in the image (figure 8).
3. I added a little vignette and accentuated the reflection of the sun on the balloon (figure 9).
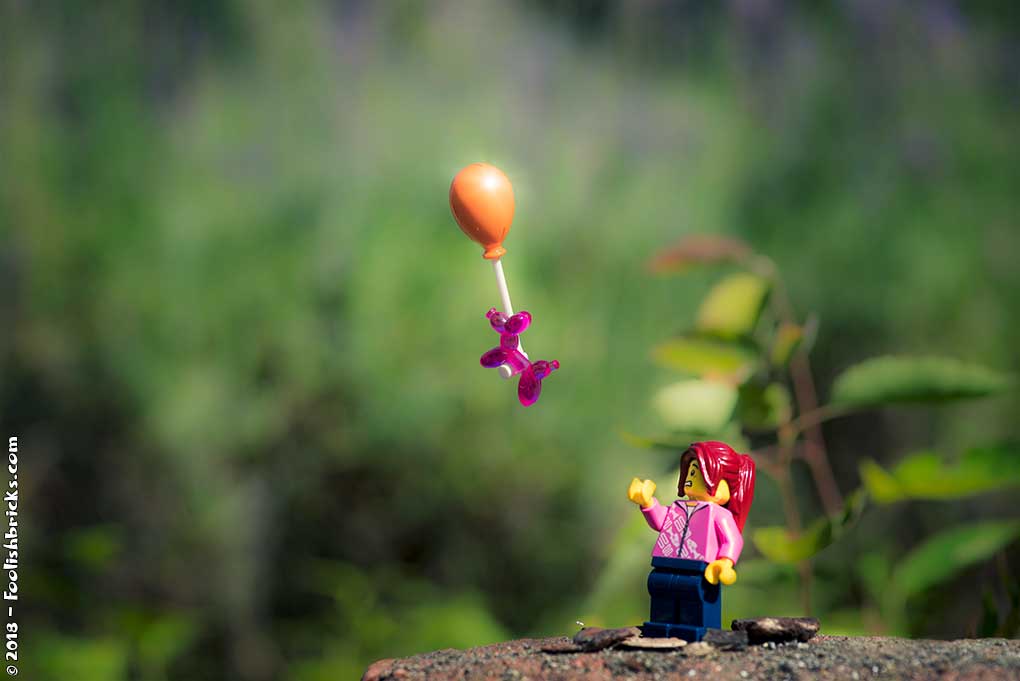
The final result
That’s it. Clean and simple. Only thing that remains is a before and after image.
OTHER POSTS THAT MIGHT INTEREST YOU;

You can subscribe to the newsletter to receive occasional updates from Foolish Bricks.
Foolish Lego - origins
behind the scenes
Foolish Lego
First off, I’d like to introduce myself; In the real world, my name is Danny. Yet, ever since my first steps on the Internet – somewhere in early nineties – I am Dwaas. I am the keeper of foolishlego.com, the home of my Lego photography and webcomic. ‘Foolish Lego’ and Dwaas are special to me. Both partly born out of the feeling of wanting to escape (or make sense of) reality and for the other part born out of wanting to share stories.
Have you ever felt the desire to do something whilst knowing you just couldn’t do it? I used to feel like that. I had many shards of stories in my mind; images, words of wisdom (or quite the opposite), small scenes, undefined thoughts, etc.
As a kid, I got the ideas out of my head by playing in my own little childhood world. As an adult that world broadened and I couldn’t figure out how to give my ideas form anymore; I’m not a gifted writer, nor can I draw any good. I tried a personal blog (in Dutch), talking about all kinds of things that were on my mind but it just wasn’t it.
Then, in late 2012, I ran into the brilliant site of a guy called “Dan of Action”, one of the Lego photography pioneers. Actually, I think he might have been the first one to do a Lego 365-project (go check it out!) and I instantly loved his brilliant work! At that precise moment, everything came together.
This was it! The perfect way to express myself besides being fun. Furthermore, I finally found a use for my Lego collection and this was the perfect opportunity to do something with my photography. Up until then, my camera was only collecting dust mainly because I had no inspiration for photography. Also, I was convinced I sucked at photography and didn’t make the time to learn. I’ve been told It’s always easier to learn something if you know where you’re going. Now I had found that goal!
I stopped thinking and just started. To put the bar up high and force myself to search for inspiration I decided to do a 365. In the real world, it’s easy for me to simply ‘forget’ to relax, a heavy workload as a medical specialist can do that to you. So, to give me some extra pressure to keep going and prevent life from getting in my way, the 365 would have to be a public one. January 1st 2013 felt like the perfect starting date and so it began.
LEGO 001: the very first one. January 1st 2013. I made this one in front of the TV. No clue about lighting, or any other technical possibility of my camera for that matter. No clue about color-correction either. And while you can’t see it because of the color-problems; I used flesh and yellow parts in one photo… even within one minifig (a sin to me these days, I only use yellow).

A 365 turned out to be more challenging than I expected. Overall, shooting one photo per day was okay. Yet, there were the busy days and stress was detrimental to my inspiration. Looking back through my photo’s I instantly recognize the uninspired ones. Other challenges were vacations and business-trips. My minifigs travelled the world with me; Nepal, Turkey, The U.S., etc. By the way, I t was always a fun moment watching the looks on the faces of customs-people at the airports, pulling the bag filled to the brim with minifigs out of my hand luggage.
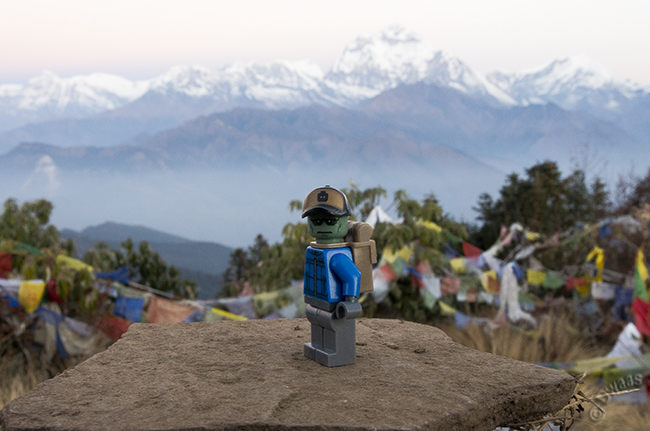
Lego 330: NEPAL! (I love the people and that country btw) After climbing 3201 mtrs (!) Dwaas reached the top of Poon hill to watch the sun rise and light up Dhaulagiri (a part of the Anapurna mountain range in the Himalaya and the highest one in this photo). It was so early and absolutely freezing cold… Dwaas kept falling over because of the wind and I had no good place to put him either. The stone is placed on an old, rotten bench. And my wife is standing right outside of the frame trying to hold the wind back.
Despite the challenges I (mostly) absolutely loved doing a 365! So much that at the (first) end I had completed a 730! I learned so much. A lot of technical stuff about photography & cinematography, and about all kinds of communities (a. o. Lego, photography, Lego-comics and toy-photographers). I learned photoshop, which also comes in handy in other areas these days. I also learned Lego-photography relaxed me, dissolved irritations and put some issues in perspective. Besides, it forced me to take time for my hobbies; It’s quite nice to only worry about a photo for a short time each day. I learned about how other people looked at me, always surprising to see people laugh at first, eventually becoming intrigued and quite impressed. I learned to see small, secret worlds within the world we live in. Also, I learned about myself. Each photo shows something of myself and I noticed that if I combine a couple of (recurring) characters on Foolish Lego… well… they are me!
Lastly, I learned about telling a story within a single photo, loving the fact that many of my photos can be interpreted in different ways. Nevertheless, these fragments or sparks of stories within the single photos weren’t enough for me. More on that a next time.
Dwaas
Lego 022: 2017 A recent appearance of Steve the Bookbunny (he never understood the concept of the ‘bookworm’ 😉 ) This photo shows part of the progress I made if you compare this one to the photo from his very first appearance (photo 12; 2013).
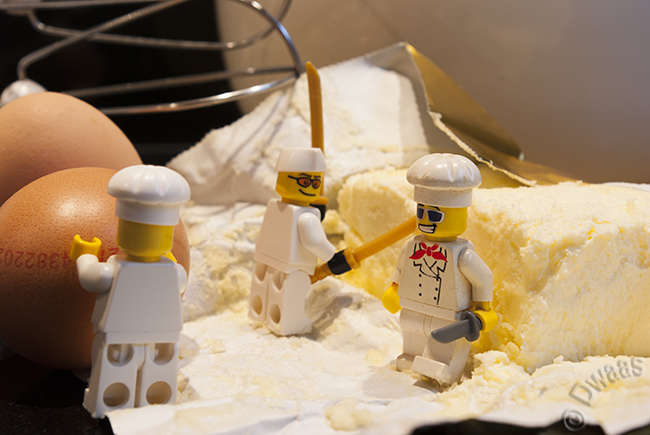
Lego 006: 2013 The very first appearance of Cool Chef; one of my frequently featured recurring characters. My wife went out of the kitchen for a second and I swooped in and put the minifigs in her ingredients. That surprised look when she returned and saw me fumbling with Lego… my camera… in her ingredients 🙂
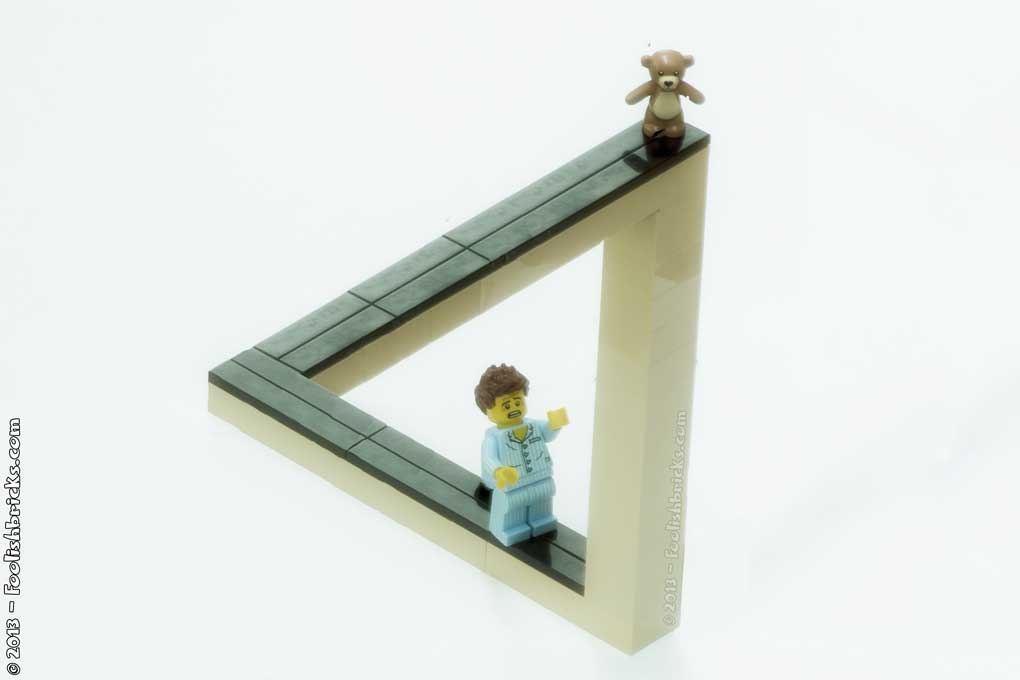
Lego 150: 2013 One of the early times where photoshop played a large role. Many possible stories in one photo… To me personally a photo about a boy dreaming he lost his beloved Teddybear… unreachable high…. but even in his dreams he’s not able to think out of the box.
Lego 001; January 1st 2016; My favorite photo of Dwaas. He’s throwing out the X-mas tree. It took me half a day to set this one up in the basement and I was very proud of the lighting and atmosphere at the time. The snow I would differently now.
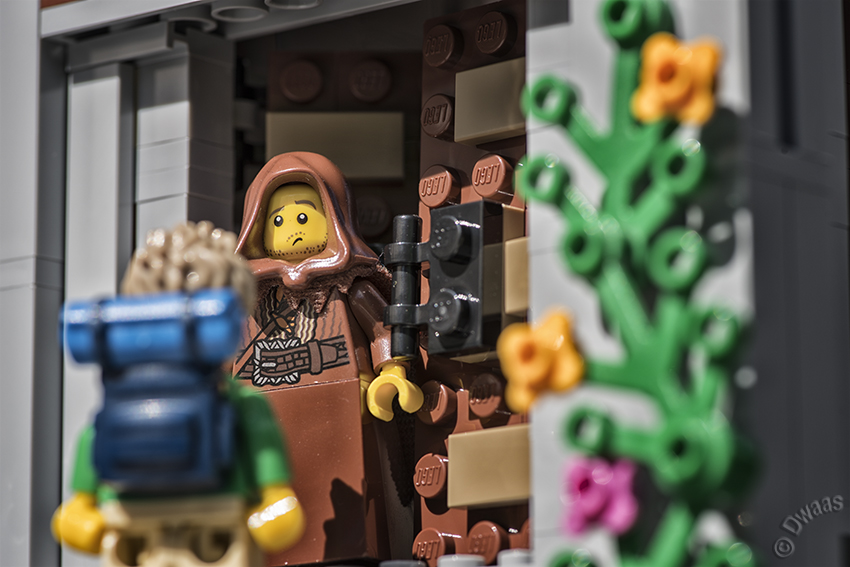
Lego 161: 2017 A recent one making me wonder what is going on here and why is the monk looking at his guest like that ? (on a personal note, this photo is the result of the fact that i meditate, and this expresses my feeling of wanting to find the rest of a monastery (for a couple of weeks) learning more about meditation, whilst knowing I’ll probably never go there).

OTHER POSTS THAT MIGHT INTEREST YOU;

You can subscribe to the newsletter to receive occasional updates from Foolish Bricks.

Photo enhancement
behind the scenes
Disclaimer: this is a (severely) outdated article!
Over the past few years, my photography skills have improved a little. As you all know, photography is about light and of course the one thing that is most problematic for me, is the lighting of my photos. I can’t seem to get the right lighting conditions in most of my photos shot with studio lights. So, my favorite source of light is – and always will be – the sun.
Currently, I’m still looking for the perfect lighting setup for in my small basement studio. Not solely for the larger lights but also regarding the smallest of light sources. So if anyone has any ideas/ tips on lights; please share them in the comments.
Because of this, I use Photoshop, to try and correct color, lighting and small imperfections that disturb me. Periodically I use it for special effects too.
For example:
– In sunlight I don’t have to enhance photo’s that much;
 The original right out of the camera
 The end-result. I only applied a graduated neutral density filter and corrected the necklace a bit.
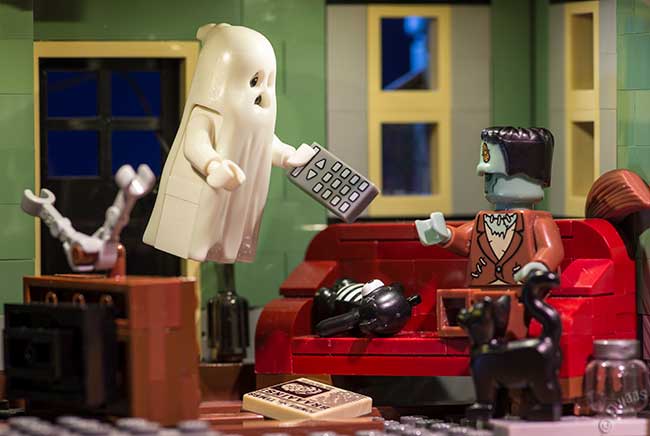
– This next photo took a bit more work, unnatural light
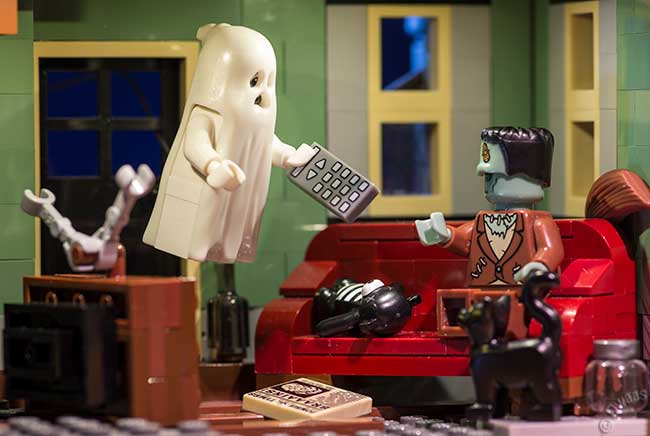 These are the two originals. I need two because of the ghost-effect. The only part of the first photo that will be used is the background of the ghost (and wire holding the ghost up), everything else will be the second photo.
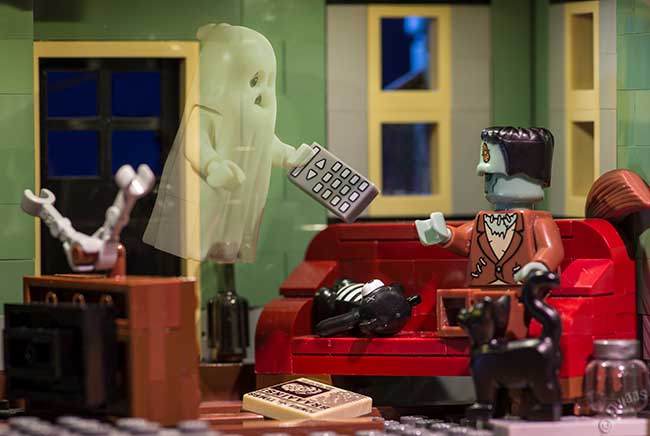
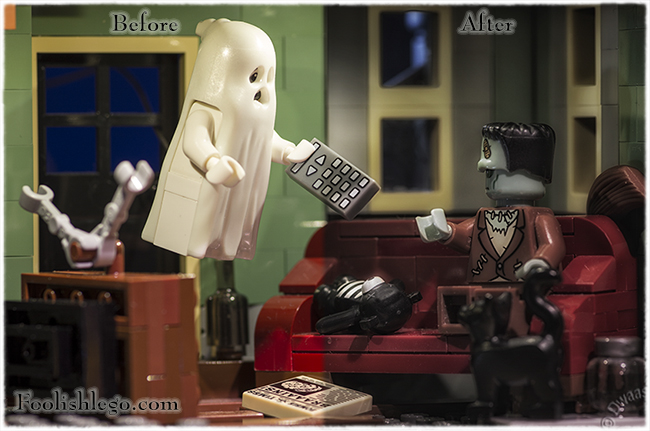
 First I removed some irritating reflections (the couch, tv, Dwaas arm, etc.) and I removed the brown brick in the left upper corner.
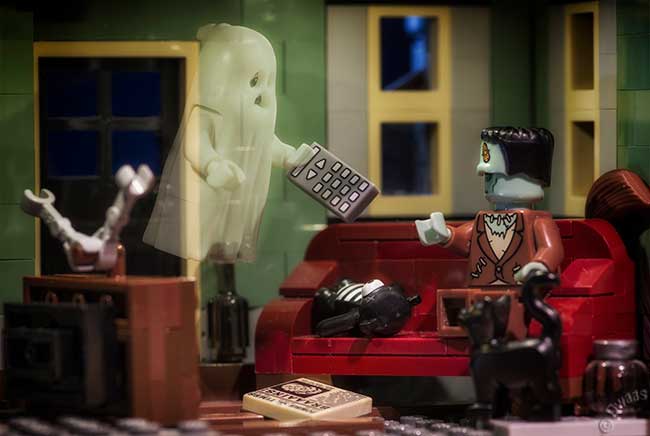
 The second photo is layered over the first photo and a mask is applied over the ghost, making the ghost transparent showing the first photo underneath (same goes for the wire holding up the ghost; this one is completely masked, showing the first photo underneath). Also I removed the reflection on he forehead of the bear. Another detail is something nobody will really notice I guess but I reconstructed the upper part of the remote and put that underneath the ghost his hand. A detail ‘m very happy with by the way 🙂
 Making the photo a bit darker.
I’m still not happy with the light, so I darkened the edges in the hope that the central part looks lighter.
 Still not completely happy…. I darkened parts a bit more. Still not happy though. It looks a bit to smooth for my tast. For example; it almost looks like Dwaas’ hand is glowing.
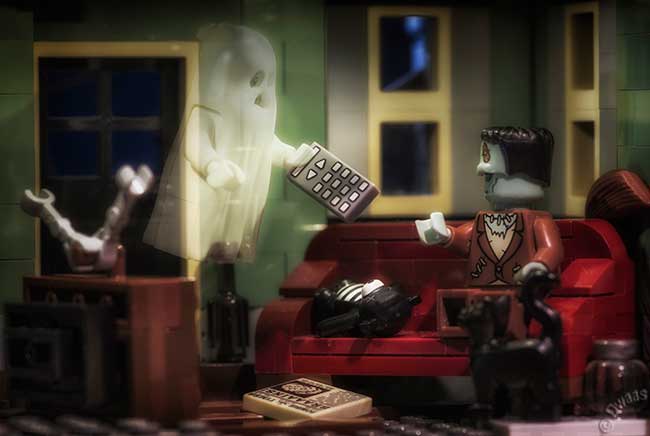
 The final photo; I optimized the contrast and darkened many parts in the photo. I wanted this photo to have a bit of a dark, gritty feel to it. It is Dwaas’ house after all, and he still lives like some kind of gloomy monster.
So that’s it. Just two examples of my photo-enhancement techniques. I hope it enhances the feeling I want to transmit about the world Dwaas and his ‘friends’ live in.
I like the possibilities of enhancing photo’s without changing essential parts and hopefully in the (near) future) I can use less and less of it by enhancing my lighting-skills.
So, do you enhance (some) of your photos? Why (not)? Some people feel cheated by this kind of enhancement; do you?
OTHER POSTS THAT MIGHT INTEREST YOU;
You can subscribe to the newsletter to receive occasional updates from Foolish Bricks.
Stage-design of the Foolish Lego comic
behind the scenes
Now that the first episode is done and over with, I recently took down the sets for the first comic. I don’t systematically keep track of how they are built, so all I have are a few photos of the sets taken from a couple of different angles. If I should need one of these sets in the future, I can hopefully recreate them pretty accurately from these photo’s.
I’ve already shown little bits and pieces of these sets, but now that they’re really gone, I’ll share most of them with you. Wistfully, some sets have already been lost, without photos (the cafe-set from one of the early episodes, or the escape-tunnel with entrance and exit for example). A couple of other sets are existing Lego sets, sometimes with a few tweaks (for example, the very first episodes on the street).
Looking back, they are quite small and simple. As I understand from some readers, they imagined them to be (a lot) bigger. That’s nice to hear because -mainly later in the comic, I tried to make the sets a little more extensive than needed so there is a feeling of space outside the panels. It also helps to make different angles of shooting the individual scenes more diverse when necessary. Most of these sets have one or two walls. For most shots that is sufficient, but sometimes I needed a wall on the other side, so I quickly put something together and put it behind the ‘actors’. (an example is the last panel in episode 18 of the first season).
As I am always complaining about time, the set-building was an important issue. Many times I wanted to move on in the comic, but I just didn’t have the time to build these sets I needed for the new scenes. It didn’t help that I didn’t have a complete script either. This kept me from the possibility of building when I had the time and using the set when necessary in a future episode. Thankfully, Eno was a very green planet… Grabbing a green baseplate, and just sticking flowers, trees and plants on there has helped me on a lot of occasions… simple, quick and effective. That explains the many forest-scenes :).
In the new episode, I have no such luck; most, if not all, of the story does not take place in some kind of forest. However, I have a general script this time around and I already built three sets! This weekend I will start on the fourth (important) set, whoho 😀 ! That feels so liberating!
One thing I have noticed is that the set-design has changed for the new season. They are larger and technically more difficult. Complete environments, and a lot of elements that can be removed, returned and changed. This makes it I can shoot from all angles. I did not do this for the first scene though, and I noticed I was missing two walls, so the next scene will be different concerning angles. Also, this time there really IS off camera space with some details no one will probably ever see in the comic. When this episode wraps up, I will post pictures of the sets.
So here they are:
 The front of Strabo’s little shop…
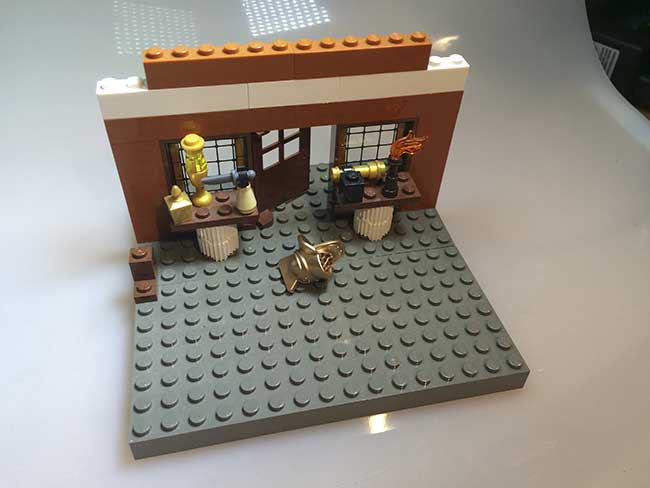 And the inside, one of the few (if not the only) set in this batch that uses both sides of the wall.
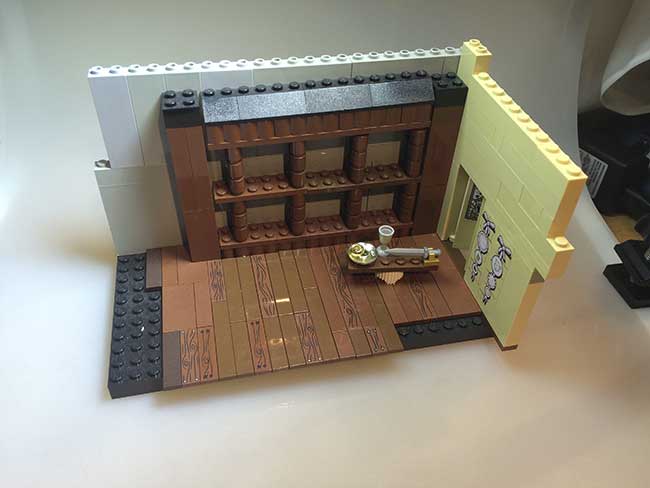
 Strabo’s shop
 and his library..
 and the basement, I used this one for a single photo once btw…
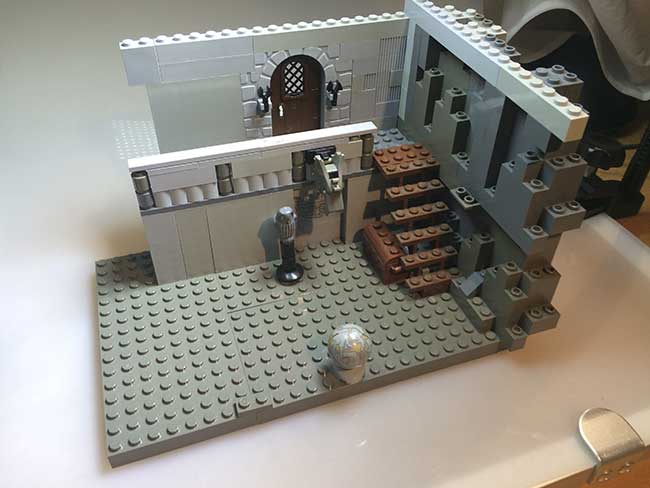
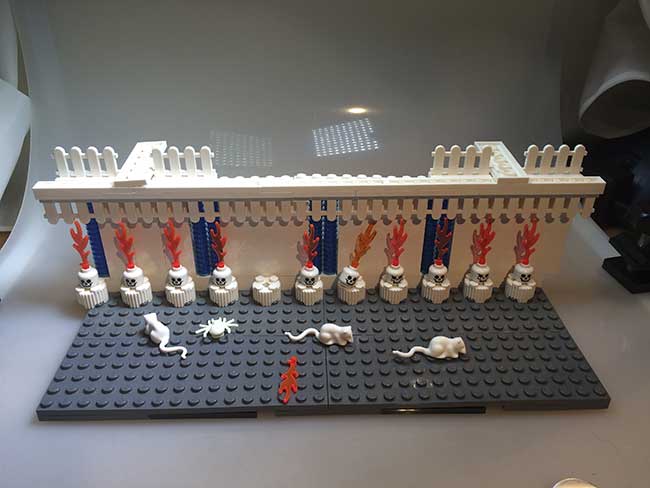
 Amida’s celldoors
 The inside AND the outside of Amida’s cell!
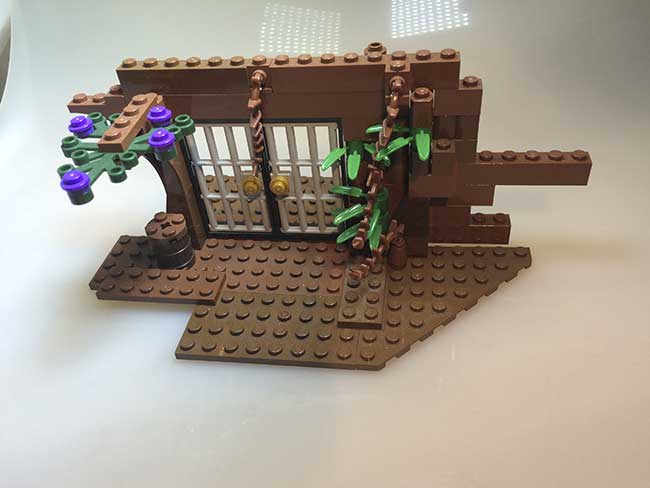
 The portal. The trees and green are all re-used
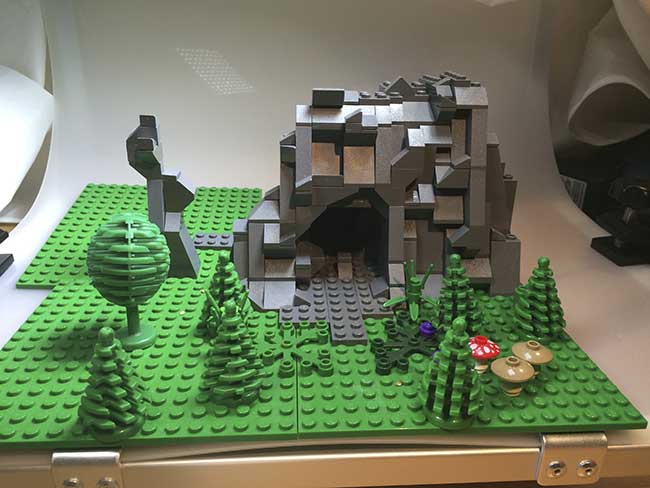
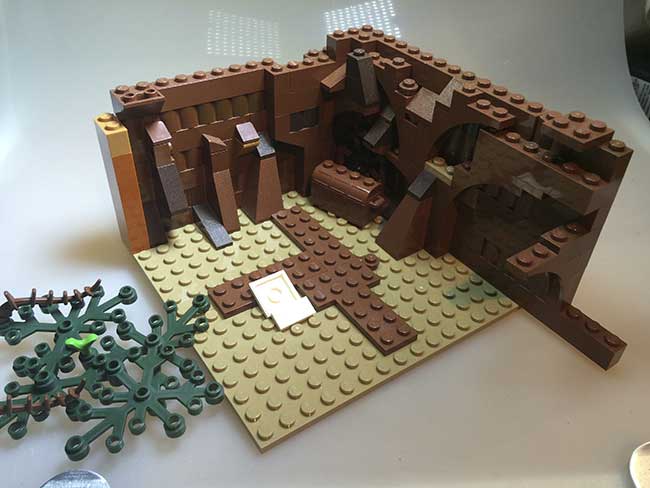
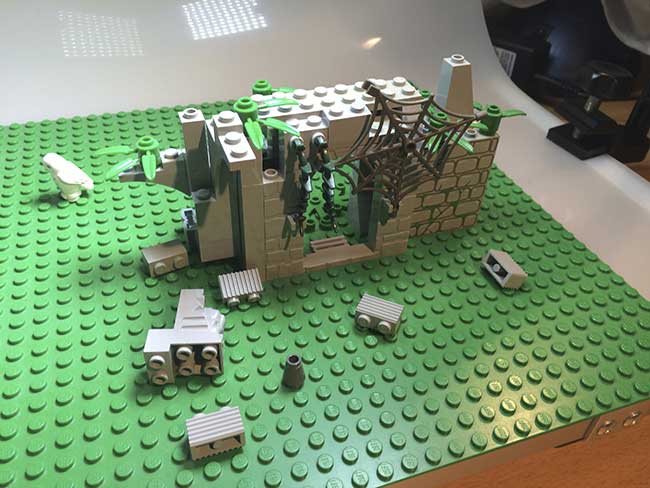
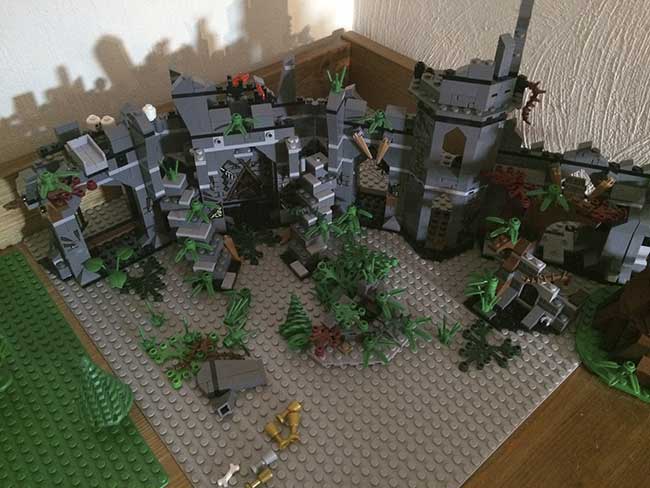
The cave entrance. My favorite set! I loved sculpting these rocks…
 The backside however…. not so nice 😉
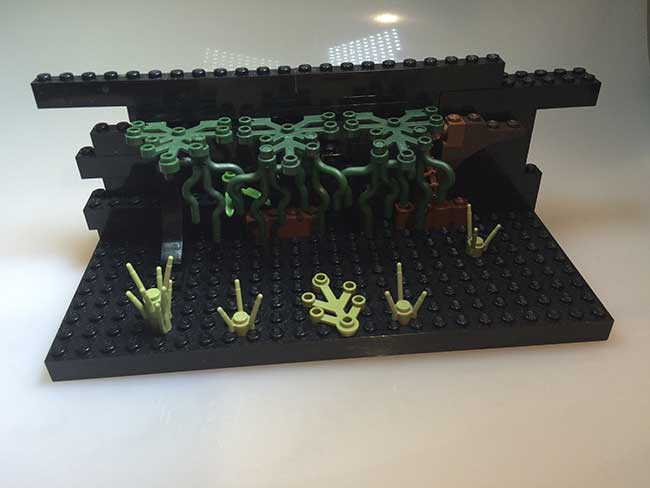
 The second portal, with lighting under ‘Willy’s eye’
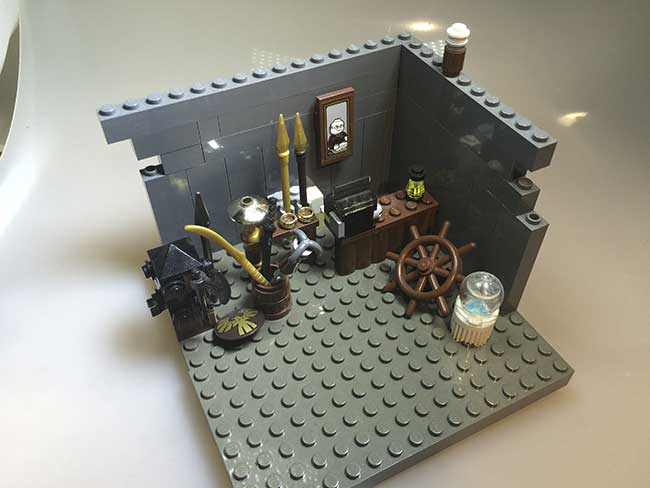
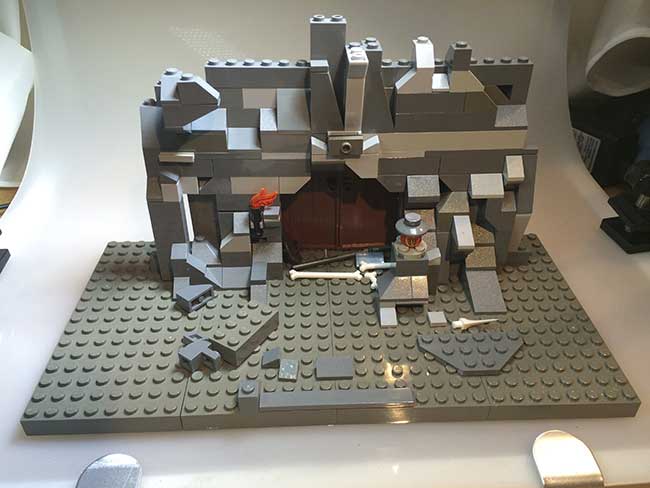
 An elaborate set, very underused. A complete backstory attached that was never used in the comic. Many different things are going on in this set. Oh and did anyone notice a picture of Dwaas on the wall? 🙂
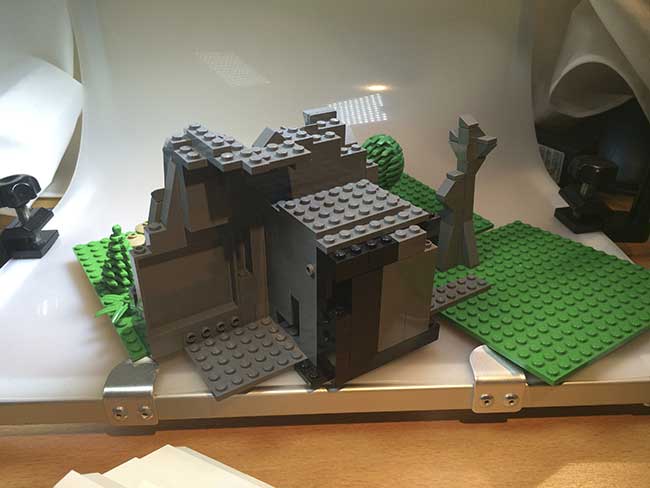
The largest set, but also quite easy. A tweaked existing ‘hobbit-set’, used for the sequence in the past (one of my favorite parts of the comic, but also the part that cost me the most time because of all the photoshopping).
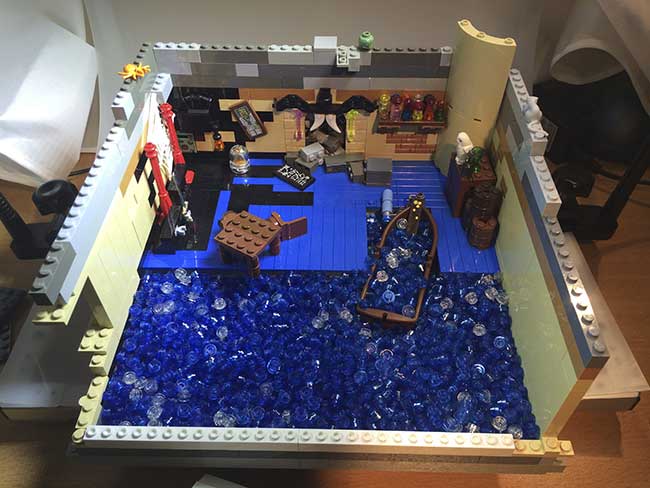
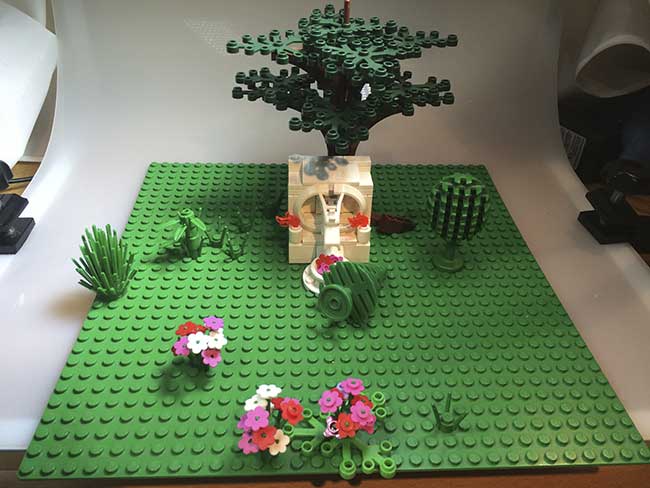 The dragonshrine. This one I did not take down, I like this little build too much. Actually the shrine was build for a 365-photo with Willy before I even thought of putting him in the comic if I remember correctly.
 Inside the sanctuary…
 The hallway inside the dragon-shrine…
That’s it for now. Do you recognize all of them? Are they different than you imagined them to be? And if you’d like to create your own comic, be sure to read the definite guide to create a Lego Brick Comic.
OTHER POSTS THAT MIGHT INTEREST YOU;

You can subscribe to the newsletter to receive occasional updates from Foolish Bricks.
The workflow of the Foolish Lego comic - Season 1
behind the scenes
Many readers asked me what my workflow is on the Foolish Lego comic. This post will bring you a general answer to how I worked on chapter one. These days I have a very different workflow.
The Foolish Lego comic has been a learning school for me. One thing that in hindsight didn’t do me any favors was that I didn’t have a clear script for this comic. I had a general idea of where it is going and of specific plot-aspects, but I didn’t know where the comic was going from episode to episode. The biggest problem with this was that the comic turned out to be pretty unbalanced and sometimes dragged. Besides this, I sometimes started a mystery without knowing where it was going. On the other hand, it gave me some freedom shooting each episode and I notice some jokes came to me the moment I was working on the episode.
Oh, one other problem the absent general script gave me, was that I had little time to build sets… that got me in trouble from time to time so sometimes I stayed in a scene too long because I had to find time to build a new set.
For the next installment of the comic, I will have a script though (more on that in another blog-post). Well, enough on this, now on to the workflow.
The workflow was straightforward.
- The evening before publication:
- I wrote the script for one or a few episodes
- I put together the panels in text, without the images
- I shot the photos
- I did a bit of post-production
- The photos went into the comic
- Some resizing
- Upload with a brief text
The writing of the script was (and is) the most time-consuming part. Only the story-arc where Willy and Amida were in Willy’s mind was very heavy on the effects, which took a LOT of time, so I was happy when that arc was over.
The script for one or a few episodes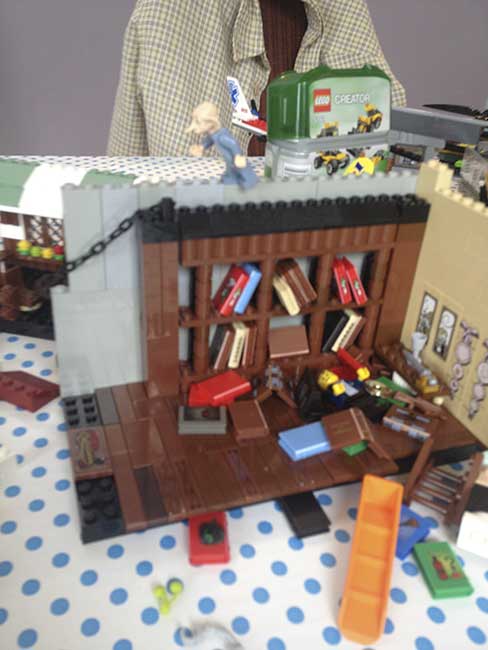
I used ‘Scrivener’ to do this. An incredible versatile piece of software which I didn’t use to its full power.
In each episode I tried to achieve a few things. At the very least, it had to be on route towards the end that I had in mind. And I try to give the episode a surprising or interesting end-panel.
Writing the text, I also imagined the scenes going along with it.
Creating the panels in text, without the images
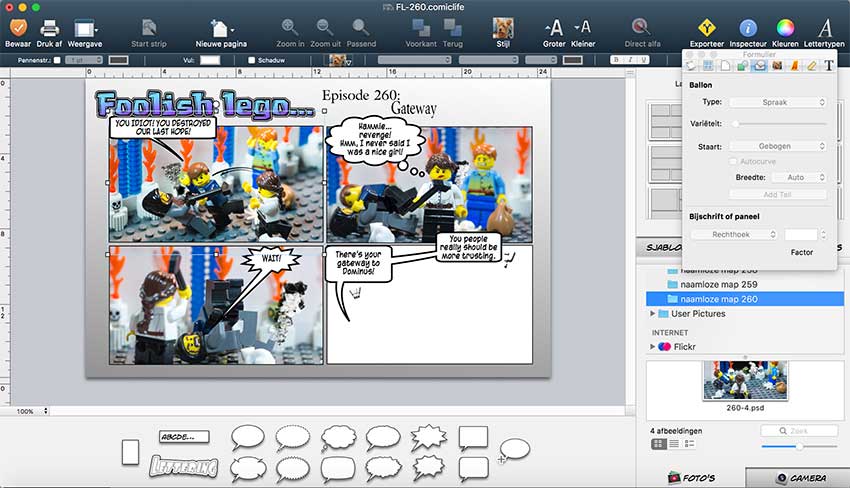
 I did this to get an idea of space in the panels. This sometimes changed the way I shot the photos and helped me envision the scenes. I’m terrible at drawing, otherwise I would’ve done this in the scriptwriting-phase. I use the “comic-life 3” software for this by the way.
Shoot the photos
For shooting the photos I used a Pentax K5-IIs combined (mostly) with a 100mm macro-lens. I shot the photos in Raw-format (DNG-files).
When I first started the comic, I used to shoot these photos all around the house, sometimes even in the backyard in the sunlight. These days I have a small ‘studio’ in the basement. It’s a multifunctional room, really. My daughter played there, my wife worked out, and I shot the comics.
The reason I wanted a studio is to get the circumstances the same in each photo, mostly lighting-wise. Also, it is good to have a place where you can leave your stuff lying around.
A bit of post-production
 I use Adobe Photoshop and NIK-software to do this. (sadly google bought the NIK software, and made it free to use recently… an ominous sign that in the near future it won’t be developed anymore, so hopefully I am really wrong on this one). I also checked contrast, sharpness etc.

When elaborate, this part takes a lot of time. Especially the first time I use a specific effect. The first time I still need to fabricate the effect (I mostly use Photoshop-tutorials on the Internet, in books or magazines for this.).
The photo’s go into the comic
This used to be the easiest part. I just dropped them into the panels I prepared in phase two. Sometimes I changed the text a little.
If my wife was around, she got to proof-read the episode, which sometimes led to a change of text and sporadically even to a new photo being shot.
I saved the episode as a comic-life and jpg-file.
Some resizing
The original file is too large to go on the internet so I resized it to 1020 x 656 pixels (that used to be 850 x 546pixels). I tried to keep the file-size maximally between 500 and 600kb in order to keep loading times on the site as short as possible.
Upload with a little text
For the final part I uploaded the episode to my website (Wordpress combined with the (free but worth a donation) plugin comic-easel.
I scheduled it for publication!
OTHER POSTS THAT MIGHT INTEREST YOU;
You can subscribe to the newsletter to receive occasional updates from Foolish Bricks.